Manage appraisal photos
Upload, scan, and manage photos from the appraisal record. Any photos added to the appraisal will also apply to the connected parcel record.
Prerequisites
Edit Appraisals permission is required to scan, upload, edit, and delete appraisal photos.
Upload a photo
Upload a photo saved to your computer.
- Go to the appropriate appraisal.
- Select the Photos tab.
- Select Add Photo.
- Populate the fields.
- Title: Enter a name to save the image under.
- Photo Date (optional): Enter or select the date the photo was taken.
- Taken By (optional): Enter the name of the person who took the photo.
- Comment (optional): Enter any comments about the photo, up to 200 characters.
- In the Choose Photo section, select the Select File button to browse for the photo, or drag and drop the file in the box.
- Select Add Photo.
The photo displays in the Photos grid.
-
To view or download the photo, select the Title hyperlink.
-
To view the photo's details, select the expander arrow next to
the title.
 Note: Once an appraisal is active, photos added to it include the version's Effective Tax Year in the photo details.
Scan a photo
Scan a photo directly into the appraisal record.
- Go to the appropriate appraisal.
- Select the Photos tab.
- Select Scan Photo.
Note: When using the Scan feature for the first time, you are prompted to download and install a program to connect to your scanner. Follow the first-time setup instructions for assistance.
- Expand the Scan panel.
- For Select Source, select the scanner to use.
If using a physical scanner, select Duplex or Auto Feeder, or select Advanced Options to set more options.
- For Pixel Type, select whether to scan in Color, B&W (black and white), or Gray (grayscale).
- Load the photo in the scanner, and then select New Scan.
Now, you may scan more photos, re-scan the photo, adjust the photo, or save it.
Scan additional photos
Add a page to the current scan.
- Load the next page into the scanner.
- On the Scan panel, select Scan.
The next page is added.
 Tip: To change the file order, drag a page to the desired location. The image you move is displayed, so you can see the image order change as you move it.
Re-scan a photo
Replace the current scan with a new one.
- Load the photo into the scanner.
- On the Scan panel, select New Scan.
The current scan is replaced by the new one.
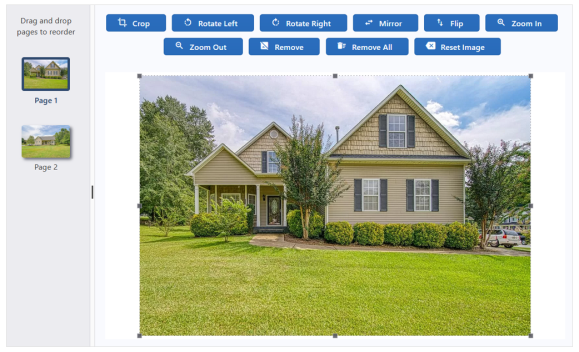
Adjust a photo
Use the toolbar at the top of the page to adjust the photo.
The following table describes the toolbar options.
| Icon | Description |

|
Crop the image. |

|
Rotate the image 90 degrees to the left. |

|
Rotate the image 90 degrees to the right. |

|
Flip the image vertically. |

|
Flip the image horizontally. |

|
Move the image closer. |

|
Move the image further away. |

|
Remove the displayed page. |

|
Remove all pages. |

|
Remove all formatting from the image. |
Upload a file
Upload a PDF, PNG, JPG, or JPEG file.
-
Expand the Add File panel.
-
Select the Select File button to browse for a file, or drag and drop the file in the box.
-
Adjust the image as needed using the toolbar options.
-
On the Save Photo panel, populate the fields and select Save Photo.
Save a photo
- Expand the Save Photo panel.
-
Populate the fields.
- Title: Enter the name to display for the photo.
- Photo Date (optional): Enter or select the date the photo was taken.
- Taken By (optional): Enter the name of the person who took the photo.
- Comment (optional): Enter any comments about the photo, up to 200 characters.
- Select Save Photo.
The document displays in the Photos grid.
To view or download the photo, select the Title hyperlink.
Replace a photo
Replace a photo in the Photos grid with a new one.
- Go to the appropriate appraisal.
- Select the Photos tab.
- Find the photo in the Photos grid and select Replace.
- Populate the fields.
- In the Choose Photo section, select the Select File button to browse for the photo, or drag and drop the file in the box.
- Select Replace Photo.
The photo displays in the Photos grid.
Edit a photo's details
- Go to the appropriate appraisal.
- Select the Photos tab.
- Find the photo in the Photos grid and select Edit.
- Edit the fields as needed.
- Select Save.
Delete a photo
- Go to the appropriate appraisal.
- Select the Photos tab.
- Find the photo in the Photos grid and select Delete icon.
- On the confirmation message, select Yes.
The photo is removed.