Create and manage parcel assessments
In CAMA, you can manage parcels assessments in one place. View data for any tax assessment year, submitted or unsubmitted, from the parcel record's Assessments tab. You can add, edit, and send new versions of assessments, and pull in updates automatically. In addition, you can work ahead by generating assessments for future years.
Prerequisites
-
Edit Assessments permission is required to create and edit unsubmitted assessments.
-
Edit Processed Assessments permission is required to edit previously submitted assessments.
View parcel assessments
From a parcel record, select the Assessments tab.
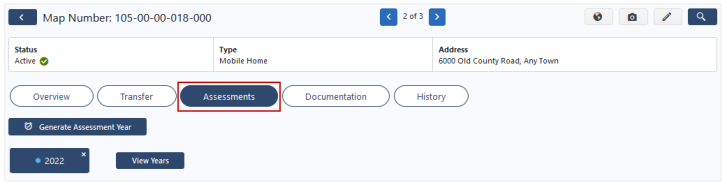
The current tax year and any unsubmitted assessment years automatically display and are marked by a blue dot.
To view submitted years, select View Years. Learn more: Display assessment years
Generate new assessment years
Generate an assessment for any tax year. You can then pull in appraisals for that tax year.
- Go to the appropriate parcel.
- Select the Assessments tab.
- Select Generate Assessment Year.
- Enter the year to generate.
- Select Generate Year.
A new tab displays for the generated year, and you edit the assessment as needed.
-
View additional details about new assessment years
 here.
here.
The following updates apply to Fees when generating a new tax year:
-
The new tax year must be greater than or equal to the Effective Tax Year on the Fee record and less than or equal to the Final Tax Year.
-
If the following conditions are met, the Fee Amount from the record the new tax year falls under is updated; however, if the tax year does not fall within one of the Fee Amounts, it is updated to 0.
-
The Fee record is not deleted.
-
The Fee Amount is not an override.
-
The Fee is not a multiplier type.
-
-
For fees with multiple Fee Amounts, the amounts are carried forward to the new assessment year, which falls within the Effective and Final Tax Years.
-
Fees with the Single Year Fee flag set in Settings > Fees do not roll forward to the newly created Assessment Year.
The following updates apply to Districts when generating a new tax year:
-
A district is not carried forward if the Final Tax Year in Settings > District/Areas is less than the new assessment year being generated.
-
In order for a district to be carried forward, the following requirements must be met:
-
The District record is not deleted.
-
The new tax year must be greater than or equal to the Effective Tax Year on the District record and less than or equal to the Final Tax Year.
-
-
In order for a district proration to be carried forward, the following conditions must be met:
-
The parent district must be created for the new tax year.
-
The new tax year must be greater than or equal to the Effective Tax Year on the assigned district that matches the proration on the parent district record and less than or equal to the Final Tax Year.
-
-
-
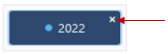
To close an assessment year, select the x on the tab.
Display assessment years
If an assessment year's tab is closed, you can display it again.
- Go to the appropriate parcel.
- Select the Assessments tab.
- Select View Years.
- Select the appropriate tax year(s).
- Select Display Years.
A tab displays with details for the selected assessment year(s).
View and print property cards
View available Property Cards and Appraisal Cards.
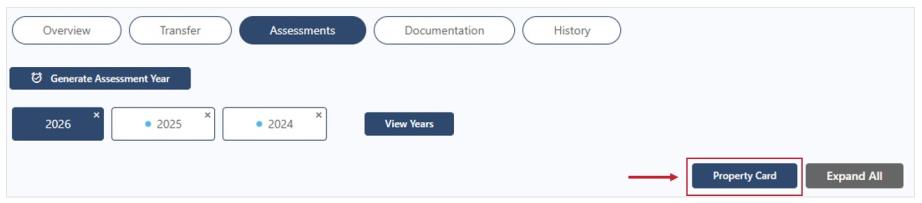
- Go to the appropriate parcel.
- Select the Assessments tab.
- Select Property Card.
- Select the Property Card and/or Appraisal Cards checkbox(es) that you wish to view.
Note: If no appraisals are linked, the View Property Card modal does not display, and a PDF of the Property Card is automatically created.
- Select View.
A PDF is generated and displays in a new window. The PDF includes the Property Card and/or Appraisal Cards that were selected.
You can now save and/or print the PDF.
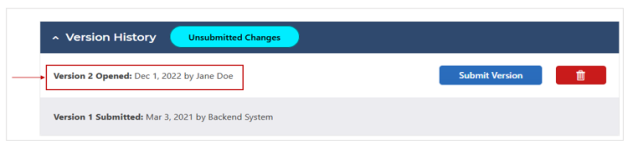
Manage assessment versions
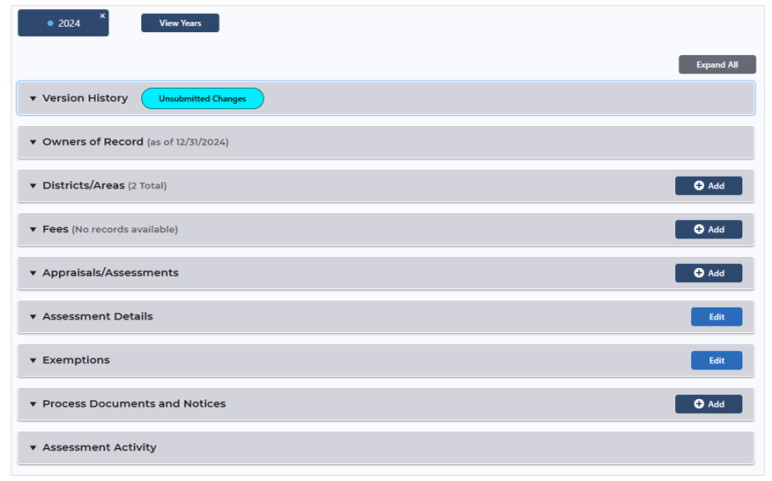
Add, submit, and remove assessment versions from the Version History panel.
Create a new version
If you need to make changes to an assessment after it has been submitted to the Auditor, you must create a new version of the assessment.
- Go to the appropriate parcel.
- Select the Assessments tab.
- On the Version History panel, select Add.
- Select Yes to confirm.
A new version is created and displays in the Version History panel.
Submit an assessment
- Go to the appropriate parcel.
- Select the Assessments tab.
- On the Version History panel, find the unsubmitted version you want to submit.
Note: You can make changes to or delete Version 1 prior to submitting the Annual Tax Roll Export, if the following conditions are met:
Version 1 is Open.
The Parcel Type is allowed for advanced billing or the Parcel Type/Year has already been submitted through the Annual Tax Roll Export.
The user has edit permissions.
- Select Submit Version.
- To mark the version as manually submitted, select the Submit Manually checkbox.
Select the
Transaction Type.
-
80 - Issue 80% Bill: Create new notice, applying the default Supplemental Code and Comments, if supplied.
-
A - Abate Notice Only: Error notice if unpaid, or approve for refund if paid. Apply default Error or Refunded Code and Comments, if supplied.
-
AR - Abate and Reissue Correction: Error notice if unpaid, or approve for refund if paid, applying the appropriate default Error or Refund Code and Comments, if supplied. Create new notice, link it to the existing notice (Replaces and Replaced By) and computer the assessment added or abated. Apply the default Supplemental Code and Comments, if supplied.
-
CA - Address Change: Post an address change.
-
NC - New Charge: Create new notice, applying the default Supplemental Code and Comments, if supplied.
-
PR - Prorate Notice: Create new notice, applying the default Supplemental Code and Comments, if supplied.
-
SA - Settled Appeal: Create new notice, applying the default Supplemental Code and Comments, if supplied.
-
TO - Transfer of Ownership: Post a new owner to the tax record.
- Enter Comments, if desired.
- Select Submit Version.
The submitted version status changes from Unsubmitted Changes to Pending Submission.
Assessments are submitted to the PUBLIQ Auditor/Treasurer system via an interface. View and track exports from the Processes > Tax Year Revision Exports screen.
Remove an assessment version
- Go to the appropriate parcel.
- Select the Assessments tab.
- In the Version History panel, find the unsubmitted version you want to delete.
- Select the delete icon and then select Yes to confirm.
The assessment version is removed.
Update Owners of Record
The parcel's owners display in the Owners of Record panel.
To update the appraisal's owner data, go to the Owners of Record panel and select Refresh Owner Data.
If updates are available, the owners of record are updated.
Add districts/areas
Add the applicable district or area, such as a tax district or subdivision name, to a parcel assessment.
- Go to the appropriate parcel.
- Select the Assessments tab.
- On the Districts/Areas panel, select Add.
All active districts and areas display in a grid. Filter the districts and areas by Name, Description, or Type as desired.
Tip: Select the expander arrow for a district/area to view associated fees. If a fee is associated with a district/area that is added to a parcel, the system automatically adds the associated fee to the parcel if it does not already exist. The Fees panel refreshes to add any fees associated with newly added districts/areas.
- Select the checkboxes for the appropriate districts/areas.
- Select Add District/Area.
The selected districts/areas display in the Districts/Areas panel.
Remove districts/areas
- In the Districts/Areas panel, select the Delete icon for the appropriate district/area.
- On the confirmation message, select Yes.
The district/area is removed from the assessment.
Manage fees
Add, edit, and remove fees from the Fees panel.
Add fees
- Go to the appropriate parcel.
- Select the Assessments tab.
- On the Fees panel, select Add.
- Select a Fee.
- Select Create Fee.
The fee displays in the Fees panel.
Edit or delete fees
- Go to the appropriate parcel.
- Select the Assessments tab.
- On the Fees panel, locate the fee.
- To edit information: Select Edit, adjust the Fee Amount, and select Save.
- To delete an owner: Select the Delete icon, then select Yes to confirm.
The updated information is reflected in the Fees panel.
Manage appraisals/assessments
All related appraisal information displays in the Appraisal/Assessments panel. Appraisals and assessments are connected, meaning you have the ability to pull updates from the appraisal record to the assessment record, if the two are integrated.
Information can be updated based on whether your system is integrated or your office allows manual updating:
-
Integrated - With integration, you can choose to pull in updates from an appraisal to the assessment.
-
Manual - Without integration, the appraisal must be edited directly. Learn more: Manage manual appraisals
Note: If your office allows manual appraisals, you can create/edit appraisals from the assessment record without being integrated.Important: If the number of distinct Class Codes on a given assessment year exceeds the limit set for Maximum Assigned Parcel Classes in Settings > CAMA Configuration, the following message appears on Appraisals/Assessments panel: Exceeds the allowed number (n) of unique Class Codes.
View appraisal details
View appraisal details for the Taxable Value Summary or the Fair Market Value Summary.
-
Go to the appropriate parcel.
-
Select the Assessments tab and expand the Appraisals/Assessments panel.
The Taxable Value Summary and Appraisal Details display by default. To view the Fair Market Value Summary and Appraisal Details, select the button.
-
Under Appraisal Details, expand a panel to view its details.
Tip: To view reassessment information, select the Display Reassessment Information button. To hide the information, select the button again.
Remove an appraisal
-
Go to the appropriate parcel.
-
Select the Assessments tab and expand the Appraisals/Assessments panel.
-
Locate the panel under Appraisal Details and select the Delete icon.
-
Select Yes to confirm.
The appraisal is removed from the assessment.
Apply available appraisal updates
If a change has been made to a parcel's appraisal on the appraisal record, the Appraisal Update Available button displays on the Appraisals/Assessment panel.

You can also pull in available appraisal updates for individual appraisals located in the Appraisal Details section. If updates are available for an appraisal version, the Update Appraisal button displays.

Select the buttons to pull in the information to the assessment record. Learn more: Manage available appraisal updates
Change an appraisal's class code
Edit an appraisal's class code from the Appraisals/Assessments panel.
-
Go to the appropriate parcel.
-
Select the Assessments tab and expand the Appraisals/Assessments panel.
-
Locate the panel under Appraisal Details.
-
Select Change Class Code.
-
Select a new class code.
-
Select Change Class Code.
The assessment appraisal class code is updated and the assessed values are recalculated.
Add or edit a manual appraisal
You can create or edit an appraisal manually from the Appraisals/Assessments panel. Learn more: Manage manual appraisals
Recalculate taxable values manually
Apply or remove a CAP or an ATI exemption modifier manually.
-
Go to the appropriate parcel.
-
Select the Assessments tab and expand the Appraisals/Assessments panel.
-
Under Appraisal Details, select Recalculate.
- Select which values to recalculate, either Current or Reassessment.
- To apply a modifier, select one from the drop-down list.
To remove a modifier, select the Remove Modifiers option.
-
Select Calculate.
The recalculated values display in the Appraisal Details panels.
Update assessment details
Edit an assessments details.
- Go to the appropriate parcel.
- Select the Assessments tab.
- On the Assessment Details panel, select Edit.
- Update the optional fields as needed.
- Tax Exempt: Set the toggle to Yes if the parcel is tax-exempt. Leave the toggle set to No if taxes are applied to the parcel.
- Property Description: Enter a short description of the property, up to 1,000 characters.
- TIF: Set the toggle to Yes if TIF applies to the property. If not, leave the toggle set to No.
- TIF Base: Enter a TIF base value.
- MCIP: Set the toggle to Yes if MCIP applies to the property. If not, leave the toggle set to No.
- Industrial Park ID: Enter an industrial park ID, if applicable.
- Mortgage Company: Select the mortgage company.
- Loan Number: Enter the loan number.
- Loan Origination Date: Enter or select the loan origination date.
-
Select Save.
The changes display in the Assessment Details panel.
Manage exemptions
Edit homestead exemption details.
-
Go to the appropriate parcel.
-
From the Assessments tab, find the Exemptions panel.
-
Select Edit.
-
Populate the optional fields.
-
Homestead Code: Select a homestead code.
-
Homestead ID: Enter an ID for the homestead.
-
Homestead Percentage: Enter a percentage for the homestead.
-
Homestead Split: Enter the homestead split.
-
Select Save.
The details display in the Exemptions panel grid.
Manage parcel document print requests
Flag a parcel form or notice to be printed from the Process Documents and Notices panel.
Add a print request
-
Go to the appropriate parcel.
-
From the Assessments tab, find the Process Documents and Notices panel.
-
Select Add.
-
Select a document/notice to flag for printing.
-
Select Add Print Request.
The request is added to the Process Documents and Notices panel with a Status of Pending Print.
Once the document is printed from Processes > Assessment Notices or the Forms modal, the Status automatically changes to Printed.
Delete a print request
-
Go to the appropriate parcel.
-
From the Assessments tab, expand the Process Documents and Notices panel.
-
Find the request and select the Delete icon.
-
Select Yes on the confirmation message.
The request is removed from the Process Documents and Notices panel.
View assessment activity
- Go to the appropriate parcel.
- Select the Assessments tab.
- Expand the Assessment Activity panel.
Assessment updates display in a grid.
To view the details of a change, select See Changes.