Configure parcel identifiers
Administrator users can create parcel identifiers and determine which ones are required. For example, if your office uses PIN and Map Numbers for parcels, you can add both types to CAMA.
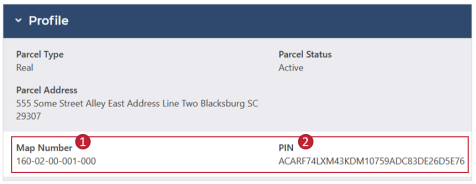
The example image and list below describe the elements of parcel identifiers.

-
Name: The name of the identifier, such as Map Number or PIN.
-
Primary identifier: The identifier type used as the Parcel ID number. When you search for a parcel, the primary identifier links to the parcel's record. It also displays at the top of the parcel record.

You can only set one primary identifier, and you can't allow users to enter duplicate identifiers of that type.
-
Required identifiers: If an identifier is required, it must be entered when creating or editing a parcel. The primary identifier is required by default; however, you can require multiple identifiers.
-
Allow Duplicates: If desired, you can allow users to enter the same Parcel ID for multiple parcels.
-
Display Order: The display order determines the order identifiers appear on a parcel record.
-
Active or inactive: Active parcel identifiers can be entered for any parcel. If an identifier is active, a check mark displays in the Active column. If an identifier is inactive, users can't enter that identifier on any new or existing parcels.
In the example above, Account Number is inactive, so it can't be used on any new parcels.
Prerequisites
Edit Parcel Identifiers permission is required to create and edit parcel identifiers.
Create parcel identifiers
-
From the left-side navigation, select Settings.
-
On the Parcel Identifiers panel, select Add Identifier.
-
Populate the fields.
-
Name: Enter the name of the identifier.
-
Required (optional): To require users to enter this identifier, set the toggle to Yes. If the identifier shouldn't be required, leave the toggle set to No.
-
Allow Duplicates (optional): To let multiple parcels have the same value for this identifier, set the toggle to Yes. If parcels shouldn't have duplicate values for the identifier, leave the toggle set to No.
-
Display Order: Enter a number to signify the order in which this identifier should display on a parcel.
For example, enter 3 if this identifier should display third in the list.
-
Select Save.
The new identifier displays in the Parcel Identifiers grid based on its Display Order.
Change the primary identifier
By default, the first identifier created is the primary identifier. However, you can change the primary identifier at any time.
-
From the left-side navigation, select Settings.
-
On the Parcel Identifiers panel, select Change Primary Identifier.
All active identifiers display in a modal.
Note: Only active identifiers that are set as Required can be made primary.
-
Find the appropriate identifier, and then select the checkbox.
-
Select Change Primary Identifier.
A check mark displays in the Primary column for the selected identifier.
Edit identifiers
Configure the settings or change the name of an identifier.
-
From the left-side navigation, select Settings.
-
In the Parcel Identifiers panel, find the appropriate identifier, and then select Edit.
-
Edit the information and configure the settings as needed.
-
Select Save.
The adjusted information displays in the Parcel Identifiers grid.
Change the display order
Change an identifier's position in the display order.
-
From the left-side navigation, select Settings.
-
In the Parcel Identifiers panel, find the appropriate identifier, and then select Edit.
-
For Display Order, enter the appropriate number for the identifier's position.
-
Select Save.
The identifier moves in the grid based on its new position.
Inactivate an identifier
To prevent users from entering an identifier type, inactivate it. Any parcels using this identifier will still display it on their parcel records.
-
From the left-side navigation, select Settings.
-
In the Parcel Identifiers panel, find the appropriate identifier, and then select Edit.
-
Select the Status toggle to set it to Inactive.
-
Select Save.
The identifier is inactive and can't be used for new parcels.
Activate an inactive identifier
-
From the left-side navigation, select Settings.
-
In the Parcel Identifiers panel, find the appropriate identifier, and then select Edit.
-
Select the Status toggle to set it to Active.
-
Select Save.
Users can now enter the identifier type for new parcels.