CH> Direct Debits
Credit Card Direct Debits
Summary
The Direct Debits process is used to generate direct debits on AR Invoice batches and UB customer accounts
that have been processed in a UB New Billing or UB Final Billing batch. Credit
card direct debits and bank account direct debits are processed in separate
Direct Debit batches because they require unique export files. This document
describes the credit card direct debit process.
Credit card information is attached to AR accounts on the AR Account Maintenance window (AR> Maintenance> Account> ACH Info tab> Credit Card section). For UB customer accounts, this information is attached using the UB Account Master Maintenance window
(UB> Maintenance> Account> Account tab> ACH Info sub-tab> Credit Card section). Pre-note batches are used to verify bank account
information when generating direct debits on bank accounts, but pre-note batches
do not apply to credit card direct debits.
When the UB billing statements are generated (UB> New Billing> Statements), if there is credit card
information attached to the UB customer account a “Do Not Pay” message will
display on the billing statement to warn the customer that the balance will be
deducted from their bank account. The credit card information does not have to
be attached to the UB customer account when the billing is generated, but the
“Do Not Pay” message will not display on the UB billing statement if the credit
card information is not attached to the account.
After an AR Invoices, UB New Billing or UB Final Billing batch has been committed, run the Clearing House module Direct
Debits process to create an export file. Not all of the transactions in the AR and UB batches will be included in the Direct Debits batch.
Only transactions that are attached to AR or UB customer accounts that have credit
card information attached will be processed in the
Direct Debits batch.
The export file generated by the Direct Debits batch will contain the billing transactions. Check with
your credit card processor to determine the format of the file that should be
generated.
Direct Debit batches that process bank account transactions are covered in a separate document.
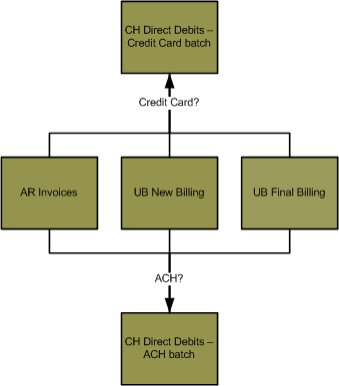
Flowchart
The objects in the diagram below represent processes in the application. Click on an object for information about a process.
Related Links
Click here for information on direct debits.
Click here for information on creating a pre-note direct debits batch.
Step by Step
2 Select the customers you would like to include
in the Direct Debits batch. 
- Select Generate on the Direct Debit palette. This will open the Generate window.
- Direct Debits are processed AR accounts by committed Invoices batches and on UB customer accounts by committed New Billing or Final Billing batches.
- Select the type of batch you would like to process in the Batch Type drop-down menu.
- Direct Debit batches can be generated based on the transactions in a committed AR Invoices, UB New Billing or UB Final
Billing batch.
- Click the Batch field label to select the batch that contains the direct debits transactions.
- The batches that display in the selection window depends on the selection in the Batch Type drop-down menu above.
- Check the This is a credit card batch toggle since you are creating a credit card transactions Direct
Debits batch.
- Only customer accounts attached to credit card information will be processed in the Direct Debit batch if this
toggle is checked. Customers with bank account information attached to their AR or UB
customer accounts will not be included in the batch.
- Check the Include Delete toggle if you would like to include Delete status accounts in the direct debits batch.
- Press ENTER to generate the Direct Debit batch immediately or enter a date and time in the field next to the
Confirm icon
 to schedule the batch to generate at a later time.
- You can view the progress of the Generate step on the Job Viewer window (SS> Utilities> Show Scheduled Jobs). If
the batch has been scheduled to generate at a later time, you can view the
scheduled date and time in the Scheduled Date/Time field.
- You cannot schedule a batch to generate on a date and time that has already passed. If you want the batch to
generate later in the evening, enter a PM in the AM/PM portion of the date field
before entering the hour.
4 Print a proof list of the transactions in the batch.
- The Proof List will display the transactions in the Direct Debits batch.
- Select Proof List from the Direct Debit palette. This will open the Proof List window.
- Select how you want the report to sort in the Sort By drop-down menu. The selection will change how the
information will display, not what is displayed in the report.
- Press ENTER to generate the proof list immediately or enter a date and time in the field next to the Confirm icon to
schedule the batch to generate at a later time.
- You can view the progress of the Proof List on the Job Viewer window (SS> Utilities> Show Scheduled Jobs). If
the report has been scheduled to print at a later time, you can view the
scheduled date and time in the Scheduled Date/Time field.
- You cannot schedule a report to print on a date and time that has already passed. If you want the report to
print later in the evening, enter a PM in the AM/PM portion of the date field
before entering the hour.
- The proof list will display the Source, Account Number, Customer Name, Transfer/Route Number, the last four
digits of the bank Account Number, total Amount for each account, and the total amount for all of the transactions being
processed.
- The Source column will display the batch information of the batch that created the transaction. This is
the same batch that was selected in the Generate step of the Direct Debits process.
- The format of the Source column is System code (XX), Batch number (XXXXX) –, Batch Month (XX)
–, Batch Year (XXXX) and an (M) or (C).
- The Source will always display a C unless the transaction was created by a manual check.
- The transfer, route and check digit number are pulled from the bank information attached to the customer
account. You can view the bank information in SS> Maintenance> Bank.
- Banks can be attached to multiple customer accounts, so changes to the transfer, route or check digit could
affect the bank account information of more than one customer account.
- The Amount column will display zeros because there are no amounts attached to the pre-note batch.
- If you are processing UB account payments, the amount of the direct debit is based on the payment settings in the
UB module (UB> Utilities> Setup> Payment tab> Direct Debit Amount field). The UB payment setting will determine if the balance forward
or current billing will be charged in the transaction.
- The Amount can also be modified using the Edit step of the Direct Debits process.
6 Print a GL Distribution report.
- Select GL Distribution from the Direct Debit palette. This will open the GL Distribution Report window.
- Enter a Journal Entry Date. This field will default to the current date.
- The journal entry date will determine the fiscal period and fiscal year that the journal entry will be
posted to.
- Select how you would like the report to display in the Report Type drop-down menu.
- The Summary report will display the GL Account, GL Account Description, Debit Amount, Credit Amount and Direct
Debit batch totals.
- The Detail report will display everything included in the Summary report as well as the AR or UB Customer Number, UB Service and UB Service Rate.
- Press ENTER to generate the GL Distribution immediately or enter a date and time in the field next to the Confirm
icon to schedule the batch to generate at a later time.
- You can view the progress of the GL Distribution report on the Job Viewer window (SS> Utilities> Show Scheduled
Jobs). If the report has been scheduled to print at a later time, you can view
the scheduled date and time in the Scheduled Date/Time field.
- You cannot schedule a report to print on a date and time that has already passed. If you want the report to
print later in the evening, enter a PM in the AM/PM portion of the date field
before entering the hour.
- If the Direct Debits are for Utility Billing accounts, the GL accounts used in the journal entry will be
pulled from the service rates or fee codes that created the balance on the
customer account.
- The GL accounts are set up on a service rate on the Service Rate Maintenance window (UB> Maintenance> Service Rate).
- The journal entry will use the Cash account to record the receipt of cash and the AR account to reverse the
receivable of the cash amount.
7 Commit the Direct Debits batch.
- Select Commit on the Direct Debit palette. This will open the Commit window.
- Press ENTER to commit the batch immediately or enter a date and time in the field next to the Commit icon to
schedule the batch to generate at a later time.
- You can view the progress of the Commit step on the Job Viewer window (SS> Utilities> Show Scheduled Jobs). If
the commit step has been scheduled to generate at a later time, you can view the
scheduled date and time in the Scheduled Date/Time field.
Springbrook Software
® All Rights Reserved 2018
Toll Free Support 866-777-0069