
AP> Manual Checks
Manual Checks
Summary
The Manual Checks process is used to input checks that have been
created outside the application. For example, this process would be used if you manually cut a check to a
vendor and do not enter the invoice or the check in the Computer Checks process.
When the application is being installed and implemented, the Manual Checks
process is also used to bring the 1099 vendor totals up to date from the
previous software. The Manual Checks process will debit the expense account
attached to the manual check and debit the cash account attached to a bank
account in order to record the payment of the manual check.
The Manual Checks process is similar to the AP Invoices process
(AP> Invoices). Manual checks are entered just like invoices and can even be
generated using purchase orders or recurring invoices (AP> Maintenance>
Recurring Invoices). You cannot create a manual check using an invoice that has
already been created using the AP Invoices process (AP> Invoices). If you paid
an invoice already entered into the application using a manually generated
check, you can void the invoice and then enter the manual check into the Manual
Checks process.
Once the transactions are entered, the process will generate a
Check Register of the activity. The Manual Checks process will not generate a
physical check like in the Computer Checks process, it will only record that a
check has been issued to a vendor (record the journal entry and create the check
in the Bank Reconciliation module).
The journal entry created by the Manual Checks process depends
on the selection in the Use Interfund Transfers for Manual checks
toggle on the AP module Setup window (AP> Utilities> Setup> Checks tab).
Click here for information on the AP module
Setup window.
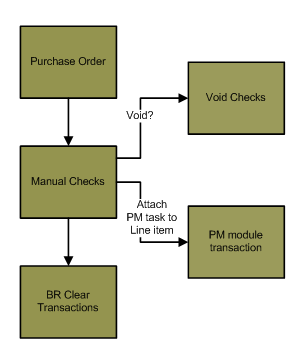
Flowchart
Each object on the diagram is a process in the application. Click on a process to open the documentation on that process.
Step by Step
1 Open or create a Manual Checks batch. 
- Select the Manual Checks palette in AP> Manual Checks. This will expand the Manual Checks
palette and display the steps of the Manual Checks process.
- Modify an existing batch or create a new batch.
- The batch month and batch year of the Manual Checks batch are used for reference only and are not necessary the
fiscal month and year the transactions in the batch will be posted to. The
fiscal period the transactions are posted to is determined by the journal Entry
date entered when creating the GL Distribution report.
- Highlight the batch in the batch number drop-down menu on the Manual Checks palette and press DELETE to delete a
batch. Any uncommitted checks in the batch will be deleted.
2 Complete the Settings step.
- The Settings step is used to select the payment date or the transactions and the bank account the checks entered in
the batch were drawn from.
- Open the Settings window (AP> Manual Checks> Settings).
- The Payment Date field is used to enter the default payment date
of the checks entered in the batch. This is only the default amount. You
will be able to change the payment date from the default on each manual
check in the batch.
- The Bank Account field is used to select the bank account the checks in the batch were paid from. Click
the Bank Account field label to select a bank account from a list or
enter the bank account code.
- The Fund field will not be enabled if you are using the multi-bank checking feature. The bank
account used to pay each invoice line item will be selected based on the GL
account attached to the invoice line items and the bank accounts attached to
those GL accounts.
- Bank accounts are created and maintained using the Bank Account Maintenance window (SS> Maintenance> Bank
Account). Click
here for information on bank account maintenance.
- The Fiscal Year field is used to set the fiscal year of the invoices generated in the Manual Checks
batch.
- Press ENTER or click the Save icon
 when complete to save the settings.
4 Create the manual checks.
5 Print the Proof List Report.
- The Manual Check Proof List displays all of the checks in the batch, including the line item
detail that was created during the Manual Checks step (AP> Manual Checks> Manual
Checks).
- Select Proof List from the Manual Checks palette. This will open the Manual Check Proof List
window.
- The Sort Order drop-down menu is used to select how the information on the report will sort.
- Select Vendor Number if you would like the information on the report to sort by vendor number.
- Select Vendor Name if you would like the information on the report to sort by vendor name.
- Click the Print icon
 to process the report immediately or enter a date and time in the field next to the Print icon to schedule the report to generate at a later time.
You can view the progress of the report on the Job Viewer window (SS> Utilities> Show Scheduled Jobs). Click here for information on the Jobs Viewer window.
to process the report immediately or enter a date and time in the field next to the Print icon to schedule the report to generate at a later time.
You can view the progress of the report on the Job Viewer window (SS> Utilities> Show Scheduled Jobs). Click here for information on the Jobs Viewer window.- Click the Print icon drop-down menu and select Print Preview to preview the report before printing.
- Click the Print icon drop-down menu and select Excel to export the report data to an Excel spreadsheet as unformatted data.
- Click the Print icon drop-down menu and select Excel (Formatted) to export the report data to an Excel spreadsheet that includes much of the Springbrook formatting found on the printed version of the report.
- Once the report is generated, you can also display the report using the View Reports window (SS> Utilities> View Report). Click here for information on the View Reports window.
- The Total for Check field will display the check total of each check. All of the invoice line
items attached to each check will be included in the Total for Check field.
- Review the Proof List.
6 Print the Check Register Report.
- The Check Register Report will display the manual checks generated in the batch.
- Select Check Register from the Manual Checks palette. This will open the Manual Check Register window.
- The Report Type drop-down menu is used to select the information that displays on the report.
- Select Register Totals Only if you would like to display the total on each manual check. No line
item detail will display on the report. If there are multiple invoice numbers on
a single check, only the check total will display on the report.
- Select Manual Check Register if you would like to display the invoice line item information.
Each invoice line item on the manual checks will display on the report.
- Click the Print icon to process the report immediately or enter a date and time in the field next to the Print icon to schedule the report to generate at a later time.
You can view the progress of the report on the Job Viewer window (SS> Utilities> Show Scheduled Jobs). Click here for information on the Jobs Viewer window.
- Click the Print icon drop-down menu and select Print Preview to preview the report before printing.
- Click the Print icon drop-down menu and select Excel to export the report data to an Excel spreadsheet as unformatted data.
- Click the Print icon drop-down menu and select Excel (Formatted) to export the report data to an Excel spreadsheet that includes much of the Springbrook formatting found on the printed version of the report.
- Once the report is generated, you can also display the report using the View Reports window (SS> Utilities> View Report). Click here for information on the View Reports window.
7 Print a GL Distribution Report.
- The GL Distribution Report will display the journal entry generated by the Manual Checks process. The selection
in the Use Interfund Transfers for Manual checks toggle on the AP module
Setup window will affect the journal entry generated by this process.
- The journal entry created by the Manual Checks process will debit the
expense account attached to the manual check line items and credit the GL
cash account attached to the bank account selected during the Settings step
(AP> Manual Checks> Settings> Bank Account field). If the Use Interfund Transfers for Manual checks
toggle on the AP module Setup window is checked, the journal entry will be
different. Click here for information on the AP
module Setup window.
- Open the GL Distribution window (AP> Manual Checks> GL Distribution).
- The Journal Entry field is used to enter the journal entry date of the journal entry
created by the batch. The journal entry date will determine which fiscal
period and fiscal year expensed for the transactions in the batch.
- The Fiscal Period and Fiscal Year fields will populate based on the value entered in the Journal Entry field.
- Click the Print icon to process the report immediately or enter a date and time in the field next to the Print icon to schedule the report to generate at a later time.
You can view the progress of the report on the Job Viewer window (SS> Utilities> Show Scheduled Jobs). Click here for information on the Jobs Viewer window.
- Click the Print icon drop-down menu and select Print Preview to preview the report before printing.
- Click the Print icon drop-down menu and select Excel to export the report data to an Excel spreadsheet as unformatted data.
- Click the Print icon drop-down menu and select Excel (Formatted) to export the report data to an Excel spreadsheet that includes much of the Springbrook formatting found on the printed version of the report.
- Once the report is generated, you can also display the report using the View Reports window (SS> Utilities> View Report). Click here for information on the View Reports window.
8 Print the Project Management module Distribution Report.
- The PM module Distribution Report will only display on the Manual Checks
palette if the Project Management module is enabled in the Accounts Payable
module (AP> Utilities> Setup> General tab> Enable Project Management
interface toggle).
- Click the Print icon to process the report immediately or enter a date and time in the field next to the Print icon to schedule the report to generate at a later time.
You can view the progress of the report on the Job Viewer window (SS> Utilities> Show Scheduled Jobs). Click here for information on the Jobs Viewer window.
- Click the Print icon drop-down menu and select Print Preview to preview the report before printing.
- Click the Print icon drop-down menu and select Excel to export the report data to an Excel spreadsheet as unformatted data.
- Click the Print icon drop-down menu and select Excel (Formatted) to export the report data to an Excel spreadsheet that includes much of the Springbrook formatting found on the printed version of the report.
- Once the report is generated, you can also display the report using the View Reports window (SS> Utilities> View Report). Click here for information on the View Reports window.
9 Commit the batch.
- Committing the Manual Checks batch will commit the journal entry generated by the batch and create a check in the
Bank Reconciliation module.
- Once the batch is committed, you can use the Bank Reconciliation module
Clear Transactions process to clear the manual checks.
- Select Commit on the Manual Checks palette to open the Commit window.
- If the Manual Checks batch includes any invoices that include Inventory Control items, you will need to provide an open IC Inventory Transactions batch number that the items can be included in. Click the IC Batch field label to select an Inventory Transactions batch.
- Click the Confirm icon
 to commit the batch.
Springbrook Software
® All Rights Reserved 2017
Toll Free Support 866-777-0069
 to display additional information about the expected layout of the import file.
 to import the file.