CH> Direct Debits
ACH Direct Debits
Summary
The Direct Debits process is used to generate direct debits on AR Invoice batches and UB customer accounts
that have been processed in a UB New Billing or UB Final Billing batch.
Bank account information is attached to AR accounts on the AR Account Maintenance window (AR> Maintenance> Account> ACH Info tab> Bank Account section). For UB customer accounts, this information is attached using the UB Account Master Maintenance window
(UB> Maintenance> Account> Account tab> ACH Info sub-tab> Bank
Account section). The bank account information is then processed through a
Pre-Note batch (CH> Direct Debits> Generate Pre-Note) in order to verify that
the bank account information entered on the customer account is correct. The
Pre-Note batch can be processed by billing cycle or for a single customer.
There will be no dollar amount attached to the transactions processed in the
pre-note batch.
When the UB billing statements are generated (UB> New Billing> Statements), if there is bank account
information attached to the UB customer account a “Do Not Pay” message will
display on the billing statement to warn the customer that the balance will be
deducted from their bank account. The bank account information does not have to
be attached to the UB customer account when the billing is generated, but the
“Do Not Pay” message will not display on the UB billing statement if the bank
account information is not attached to the account.
After the AR Invoices, UB New Billing or UB Final Billing batch has been committed, run the Clearing House module Direct
Debits process to create an export file. Not all of the transactions in the UB
New Billing or Final Billing batch will be included in the Direct Debits batch.
Only transactions that are attached to UB customer accounts that have bank
account information attached to their UB customer account will be processed in
the Direct Debits batch.
The export file will contain the billing transactions in a format that can be processed by an ACH
processing bank. Check with your processing bank about the format of the export
file and/or obtain a copy of ACH RULES: A complete Guide to Rules & Regulations
Governing the ACH Network, published by the National Automated Clearing House
Association (NACHA:
http://www.nacha.org/).
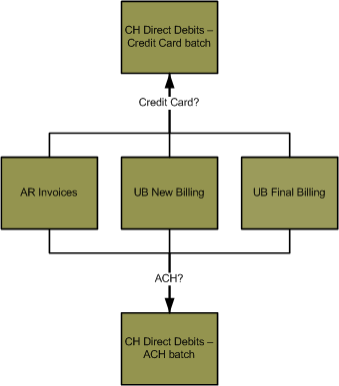
Flowchart
The objects in the diagram below represent processes in the application. Click on an object for information about that process.
Related Links
Click here for information on direct debit pre-note batches.
Step by Step
2 Select the customers you would like to include in the Direct Debits batch. 
- Select Generate on the Direct Debit palette. This will open the Generate window.
- Direct Debits are processed on AR accounts by committed Invoices batches and on UB customer accounts by committed New Billing or Final Billing batches.
- Select the type of batch you would like to process in the Batch Type drop-down menu.
- Direct Debit batches can be generated based on the transactions in a committed AR Invoices, UB New Billing or UB Final
Billing batch.
- Click the Batch field label to select the batch that contains the direct debits transactions.
- The batches that display in the selection window depends on the selection in the Batch Type drop-down menu above.
- Check the Include “Delete” status accounts toggle if you would like to include Delete status accounts
in the direct debits batch.
- This generally only applies to UB customer accounts that have been processed through the UB Final Billings
process and will not be active when generating a direct debits batch on UB New Billing accounts.
- Press ENTER to generate the Direct Debit batch immediately or enter a date and time in the field next to the
Confirm icon
 to schedule the batch to generate at a later time.
- You can view the progress of the Generate step on the Job Viewer window (SS> Utilities> Show Scheduled Jobs). If
the batch has been scheduled to generate at a later time, you can view the
scheduled date and time in the Scheduled Date/Time field.
- You cannot schedule a batch to generate on a date and time that has already passed. If you want the batch to
generate later in the evening, enter a PM in the AM/PM portion of the date field
before entering the hour.
4 Print a proof list of the transactions in the batch.
- The Proof List will display the transactions in the Direct Debits batch.
- Select Proof List from the Direct Debit palette. This will open the Proof List window.
- Select how you want the report to sort in the Sort By drop-down menu. The selection will change how the
information will display, not what is displayed in the report.
- Click the Print icon
 to process the report immediately or enter a date and time in the field next to the Print icon to schedule the report to generate at a later time.
You can view the progress of the report on the Job Viewer window (SS> Utilities> Show Scheduled Jobs). Click here for information on the Jobs Viewer window.
to process the report immediately or enter a date and time in the field next to the Print icon to schedule the report to generate at a later time.
You can view the progress of the report on the Job Viewer window (SS> Utilities> Show Scheduled Jobs). Click here for information on the Jobs Viewer window.- Click the Print icon drop-down menu and select Print Preview to preview the report before printing.
- Click the Print icon drop-down menu and select Excel to export the report data to an Excel spreadsheet as unformatted data.
- Click the Print icon drop-down menu and select Excel (Formatted) to export the report data to an Excel spreadsheet that includes much of the Springbrook formatting found on the printed version of the report.
- Once the report is generated, you can also display the report using the View Reports window (SS> Utilities> View Report). Click here for information on the View Reports window.
- The proof list will display the Source, Account Number, Customer Name, Transfer/Route Number, the last four
digits of the bank Account Number, total Amount for each account, and the total amount for all of the transactions being
processed.
- The Source column will display the batch information of the batch that created the transaction. This is
the same batch that was selected in the Generate step of the Direct Debits
process.
- The format of the Source column is System code (xx), Batch number (xxxxx) –, Batch Month (xx)
–, Batch Year (xxxx) and an (M) or (C).
- The Source will always display a C unless the transaction was created by a manual check.
- The transfer, route and check digit number are pulled from the bank information attached to the customer
account. You can view the bank information in SS> Maintenance> Bank.
- Banks can be attached to multiple customer accounts, so changes to the transfer, route or check digit could
affect the bank account information of more than one customer account.
- The Amount column will display zeros because there are no amounts attached to the pre-note batch.
- If you are processing UB account payments, the amount of the direct debit is based on the payment settings in the
UB module (UB> Utilities> Setup> Payment tab> Direct Debit
Amount field). The UB payment setting will determine if the balance forward
or current billing will be charged in the transaction.
- The Amount can also be modified using the Edit step of the Direct Debits process.
5 Create the file that will be used by your processing bank to process transactions.
- The Export ACH File step will create a file to send to your processing bank that contains the bank account
information of the customer accounts included in the batch.
- Select Export ACH File from the Direct Debit palette. This will open the Export ACH File window.
- The options in the Export ACH file are intended to be used in conjunction with ACH RULES: A complete Guide to
Rules & Regulations Governing the ACH Network, published by the National
Automated Clearing House Association (NACHA). Your processing bank may also have
information about what format they would like the ACH file submitted in.
- The Export Options section is used to set up how the export file will be configured.
- The fields referred to below that are in CAPITALS are fields that display in the export file.
- The Tax ID Start Digit field is used to enter a digit before the Immediate Origin Info field. This will add the
value in the field to line 1, position 14 of the export file.
- The Immediate Origin Info field will generally display the Federal Tax Identification number set up in SS> Utilities> System
Setup> Organization tab> Fed Tax ID field.
- If there is a value entered in the Web Direct Information field, the value in the Tax ID Start Digit field will display before the web direct information number.
- The ANSI ID field is used to enter the ANSI ID number, which is also referred to as the ANSI
Identification Code Designator (ICD). The ANSI ID NUMBER is placed in front of the COMPANY IDENTIFICATION field on the
export file. The value in this field will display on line 2, position 41 of the export file.
- Leave the ANSI ID Number field blank if an ANSI ID number should not be included on the export file.
- Standard Identification Code Designators are:
- IRS Employer Identification Number (EIN): 1
- Data Universal Numbering Systems (DUNS): 3
- User Assigned Number: 9
- The appropriate ANSI ID Number for most Springbrook customers is “1”.
- The selection in this field affects: Record Type 8, position 45. Record Type 5, position 41.
- The Web Direct Info field will display on the first line of the export file in position 14 through
22. If you enter a value in the Web Direct Information field that is less than
nine digits, the value will be padded with zeroes (For example, 99 will display
as 000000099 on the export file).
- Entering a value in the Web Direct Information field will replace the federal tax identification number
that normally displays in this position. If the Use Routing Number for
Immediate Origin toggle is checked, the value in that position will be the
routing number in the Immediate Origin Code field.
- If there is a value entered in the Tax ID Start Digit field, the Web Direct
Information number will shift one position over and will display in position 15
through 23 of the first line.
- The federal tax identification number is entered in the System Setup window (SS> Utilities> System Setup>
Organization tab> Federal Tax ID field).
- Check the Generate with zero amounts toggle if you would like all transaction amounts in
the file zeroed out. This option is generally used on pre-note batches to verify
the bank account information of customer accounts before processing transactions
on those accounts. All direct deposit amounts will be reported as 0, but no
changes will be made to the Direct Debits batch. The direct deposit amounts will
still display on the proof list and GL distribution report of the Direct Debits
process.
- The TRANSACTION CODE (positions 2-3) of record type 6 will be incremented by 1 if this option is checked.
- The Default TRANSACTION CODE for Direct Deposits is 22 (Automated Deposit), pre-notification code is 23.
- If a PPD Offset record is being created (Sweep Account toggle on the Export ACH File window is not
checked and the Include Offset toggle is checked), the TRANSACTION
CODE of the offset record will also be incremented by 1.
- The selection of this toggle affects: Record Type 6, positions 2-3; Record Type 6, positions 30-39.
- Check the Use routing number for immediate origin toggle to replace the
Federal Tax ID number on the first line of the export file with the route,
transfer and check digit of the Origin Bank.
- If this toggle is checked, position 14 will have a blank space, and the route, transfer, and check digit
will be placed in position 15 through 23.
- If there is a value in the Web Direct Info field it will be overwritten on the export file by the
route, transfer and check digit.
- Check the Use immediate origin for trace number toggle to put the IMMEDIATE ORIGIN TRACE NUMBER position
on the export file.
- Check the Use sweep account toggle to set the ‘debit’ and ‘credit’ to zero.
- The selection on this toggle affects: Record Type 8, positions 21-32; Record Type 9, positions 32-43.
- Check the One transaction per account toggle to combine export line items with the same bank account into
a single line item.
- Check this toggle if a single customer is regularly responsible for more than one UB or AR account. This will create a single debit on the customer's account rather than multiple debits for multiple UB or AR accounts.
- By default, the same bank account information will display on two separate line items if the same bank account is
used by more than one UB or AR customer account.
- Check the Include offset record toggle to include an additional line in the file that
contains the ‘credit’ sum of the file.
- If the Use sweep account toggle is checked, no offset record will be created.
- The selection on this toggle creates one additional Type 6 record after all regular Type 6 transaction
records have been created. Amount field will contain a sum of all Record Type 6
amounts.
- Check the Suppress carriage return/line feed toggle if you would like to remove carriage
returns and line feed characters from the export file. The data will be stored
in a single line on the output file if this option is selected.
- The selection in this toggle will affect all records in the export file.
- The Bank Information section is used to specify the details associated with the bank that will be receiving the exported ACH file.
- The Destination Name field displays the name of the bank that is used to process the ACH transactions.
- This field will display the bank name of the bank selected in the Immediate Destination Info field.
This field will not be enabled.
- The selection in this field affects: Record Type 1, positions 42-63.
- The Immediate Destination Info field displays the routing number of the processing bank. The
selection in this field will also affect the bank name that displays in the Destination Name field.
- Click the Immediate Destination Info field label to select the processing bank from a list.
- The processing bank must be set up on the Bank Maintenance window (SS> Maintenance> Bank).
- The field displays 10 characters and begins with a blank in the first position, followed by the
four-digit Federal Reserve Routing Symbol, the four-digit ABA Institution
Identifier, and the Check Digit.
- The selection in this field affects: Record Type 1, positions 4-13; Record Type 5, positions 80-87; Record
Type 6, positions 13-29.
- The Origin Name field will display the bank description of the bank selected in the Immediate Origin
Information field. The value in this field will populate on the export file if
the Use Routing Number for Immediate Origin or the Use immediate
origin for trace number toggle is checked.
- The origin is the ACH operator or sending point that is sending the file.
- The origin will appear on line one, position 64 through 86.
- The Immediate Origin Info field will display the routing number of the sending point of the export
file. This field will be included in the export file if the Use routing
number for immediate origin toggle is checked.
- The 10 digit field begins with a blank in the first position, followed by the four-digit Federal Reserve Routing
Symbol, the four-digit ABA Institution Identifier, and the Check Digit.
- The immediate origin code will display on the first line of the export file in position 14 through 23.
- If there is a value in the Web Direct Info field, the value in that field will overwrite the
Immediate Origin Code.
- The Effective Date field is used to enter the effective
date of the batch. This field will default to two days from the current date
because banks usually take two days to complete the file transfers.
- The effect date will display on line 2, positions 70 through 75.
- The Originator Status Code field is “1” for most Springbrook
customers. This code refers to the ODFI initiating entry. Currently
assigned Originator Status Codes:
- ADV file prepared by an ACH Operator: 0
- Depository financial institution that has agreed to be bound by ACH rules: 1
- Federal government entity or agency not subject to ACH rules: 2
- The originator status will display on line 2, position 79.
- The Login field is used to add text to the beginning of the export file.
- The Login field can be up to 255 characters in length.
- Click the Confirm icon when complete to generate the export file immediately or enter a date and time in the field next to the Confirm icon to schedule the export file to generate at a later time.
You can view the progress of the export on the Job Viewer window (SS> Utilities> Show Scheduled Jobs).
- Once the export has finished processing, the Export Settings window will open. This window is used to specify the export path for the file.
- Check the Open toggle if you would like to open the exported file after it is saved locally.
- Enter the export path location and click the Save icon
 to export the file to the local path.
6 Print a GL Distribution report.
- Select GL Distribution from the Direct Debit palette. This will open the GL Distribution Report window.
- Enter a Journal Entry Date. This field will default to the current date.
- The journal entry date will determine the fiscal period and fiscal year that the journal entry will be
posted to.
- Select how you would like the report to display in the Report Type drop-down menu.
- The Detail version of the report will display the UB customer account, UB service and service rate information. The
summary version of the report will only display the GL account information.
- The Summary report will display the GL Account, GL Account Description, Debit Amount, Credit Amount and Direct
Debit batch totals.
- The Detail report will display everything included in the Summary report as well as the Account Number, UB Service, and UB Service Rate.
- Click the Print icon to process the report immediately or enter a date and time in the field next to the Print icon to schedule the report to generate at a later time.
You can view the progress of the report on the Job Viewer window (SS> Utilities> Show Scheduled Jobs). Click here for information on the Jobs Viewer window.
- Click the Print icon drop-down menu and select Print Preview to preview the report before printing.
- Click the Print icon drop-down menu and select Excel to export the report data to an Excel spreadsheet as unformatted data.
- Click the Print icon drop-down menu and select Excel (Formatted) to export the report data to an Excel spreadsheet that includes much of the Springbrook formatting found on the printed version of the report.
- Once the report is generated, you can also display the report using the View Reports window (SS> Utilities> View Report). Click here for information on the View Reports window.
- If the Direct Debits are for Utility Billing accounts, the GL accounts used in the journal entry will be
pulled from the service rates or fee codes that created the balance on the customer account.
- The GL accounts are set up on a service rate on the Service Rate Maintenance window (UB> Maintenance> Service Rate).
- The journal entry will use the Cash account to record the receipt of cash and the AR account to reverse the
receivable of the cash amount.
7 Commit the Direct Debits batch.
- Select Commit on the Direct Debit palette. This will open the Commit window.
- Press ENTER to commit the batch immediately or enter a date and time in the field next to the Confirm icon to
schedule the batch to generate at a later time.
- You can view the progress of the Commit step on the Job Viewer window (SS> Utilities> Show Scheduled Jobs). If
the commit step has been scheduled to generate at a later time, you can view the
scheduled date and time in the Scheduled Date/Time field.
Springbrook Software
® All Rights Reserved 2017
Toll Free Support 866-777-0069