Springbrook Analytics
Refining the Look of the Sample Report
This is the fourth of four topics that cover creating a new report from scratch. Please read the topics in order to ensure a clear understanding of the new report creation process.
-
Refining the Look of the Sample Report - current topic
This topic covers how to refine the report to improve readability. Remember to save your progress frequently.
-
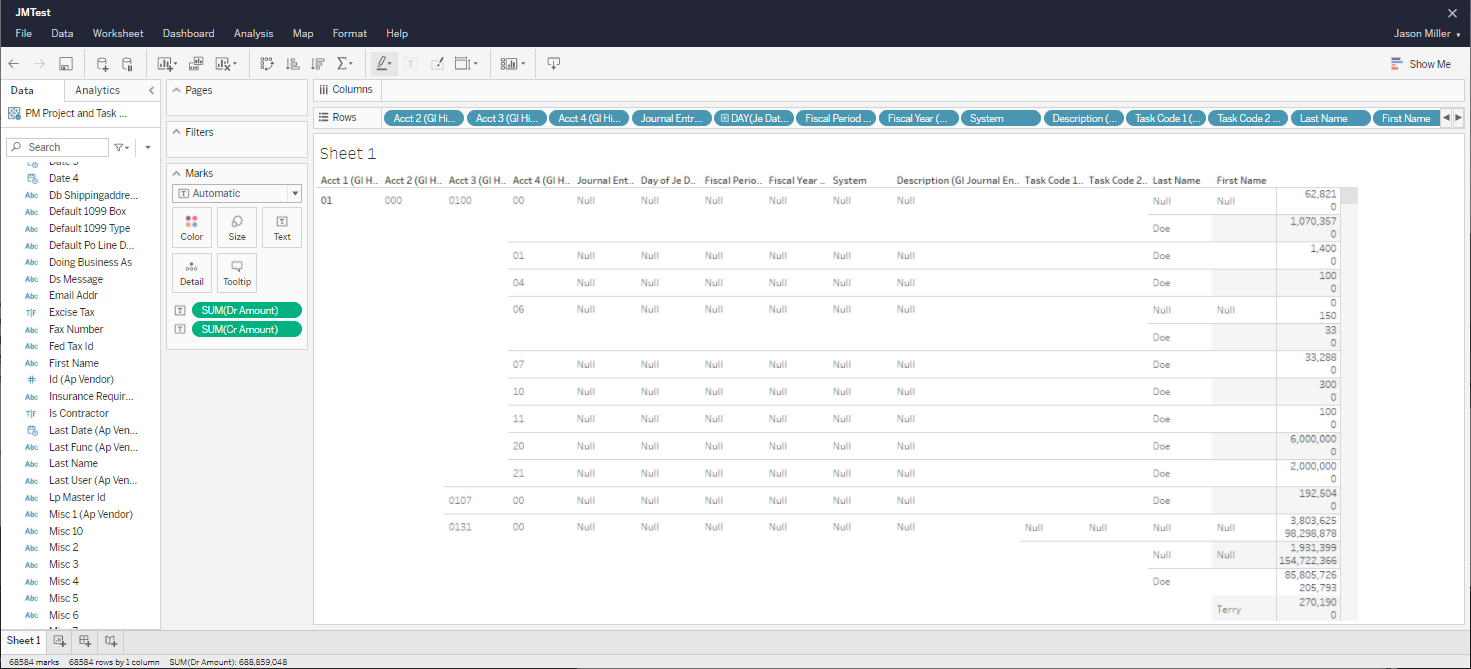
After adding all the required data to the report, the result should look like this:
-
There are a number of changes that can be made to improve the readability of the report.
-
The Account 1, Account 2, Account 3, and Account 4 data can be displayed on every line.
-
The Account data can be combined into a single column.
-
The Last Name and First Name fields can be combined into a single Vendor Name field.
-
The Debit Amount and Credit Amount can be displayed in individual columns.
-
Totals can be added to the report.
-
Filters can be added to report.
-
Null values can be removed from the report.
-
A title can be added to the report.
-
-
Each of these refinements will be outlined in the steps below.
-
The first refinement we are going to make is to display all account data - Account 1, Account 2, Account 3, and Account 4 - on every line in the report.
-
This is accomplished by a report sorting trick. By adding a unique identification number, in this case the GL History ID, to every line in the report, the primary sort will be that identification number rather than the Account 1 number.
-
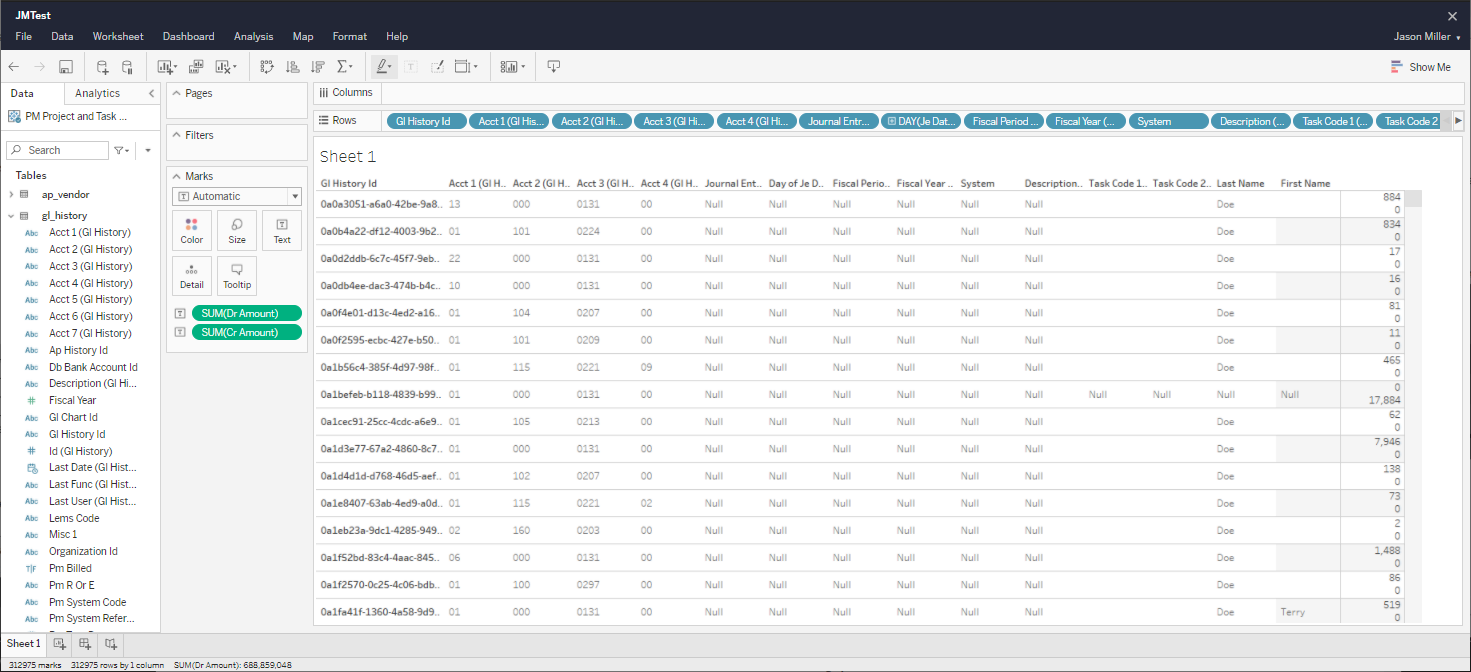
Drag the GL History ID field from the gl_history table to the first spot on the Rows field.
-
As you can see, each line in the report now displays the full set of account data. However, the GL History ID field also displays on each line in the report. We want to use that data as a primary sort, but we don't want to display that data.
-
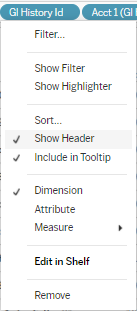
Open the drop-down menu on the GL History ID field and deselect the Show Header option.
-
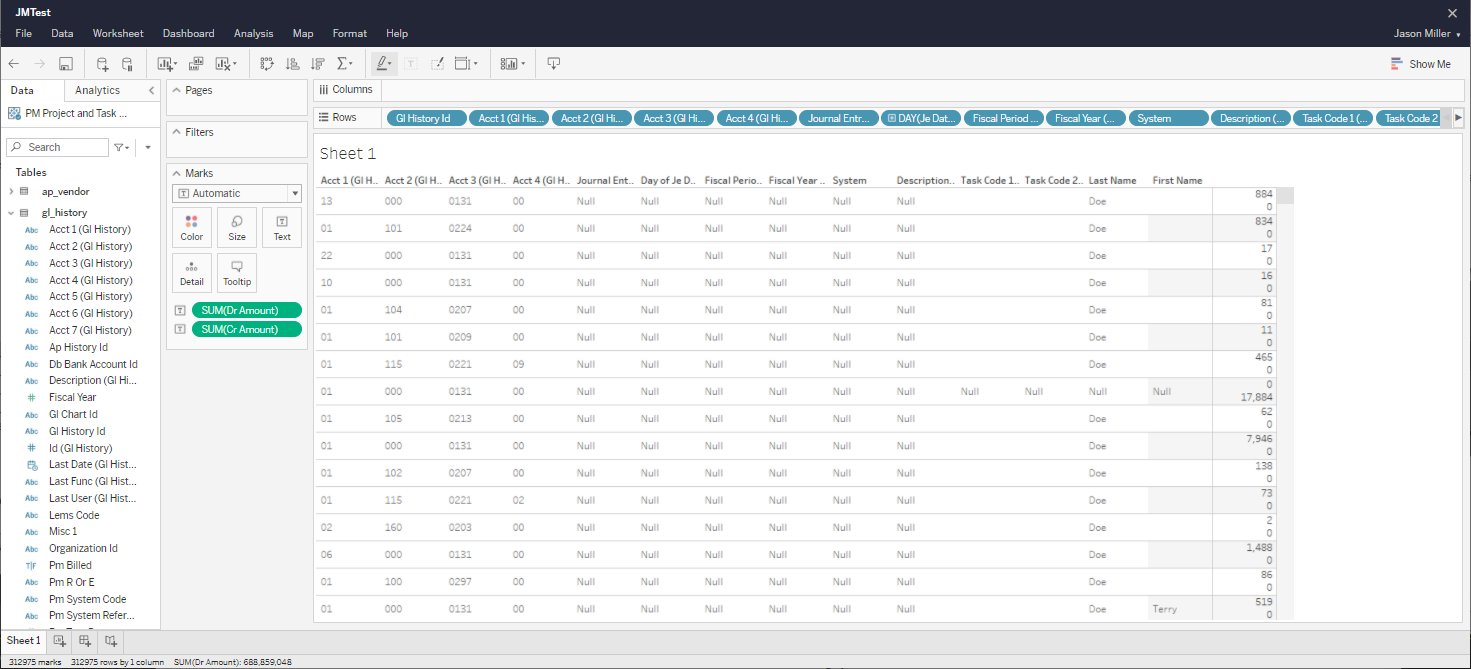
The report will still be sorted by the GL History ID, but that data will not display on the report.
-
We now have the Account 1, Account 2, Account 3, and Account 4 data displaying on each line in the report.
-
Displaying all the account data on each line in the report eliminates the confusion caused by aggregating account sections, but can also be a bit overwhelming. In order to improve the readability of the report, we can combine all the account sections into a single column by creating a calculated field.
-
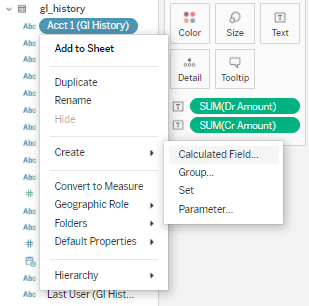
Locate the Acct 1 (GL History) field in the gl_history table on the Data pane. Click the drop-down for that field and select Create > Calculated Field.
-
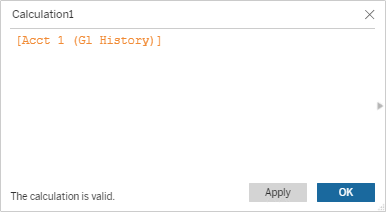
This will open the Calculated Field window.
-
Now you can add the other account sections to the calculated field.
-
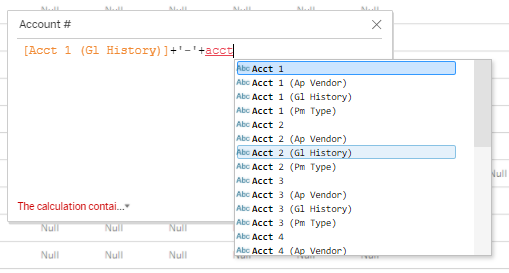
Each section must be joined with a plus sign +. You can also insert a dash between each section of the account number by adding a dash between single quotation marks '-' followed by another plus sign +.
-
After adding the plus sign, the dash, and another plus sign, you can add the next account section by typing and selecting the Acct 2 (GL History) field from the fields Tableau suggests.
-
As you are entering the account sections, you'll notice the calculation notification at the bottom of the window. This notification will alert you if something you've added to the calculation will result in an invalid calculation. You can click the drop-down menu next to the notification to get more details about why the calculation is invalid.
-
You can also use the slide-out menu on the right side of the calculation window to see all the calculations available.
-
For more detailed information on specific calculated fields, see the Tableau help article Get Started with Calculations at https://help.tableau.com/current/pro/desktop/en-us/calculations_calculatedfields_create.htm.
-
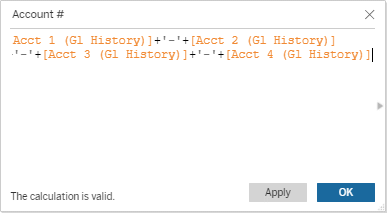
Complete the account field by entering the full set of account sections and adding a calculated field title. In this example the field has been named Account #.
-
Click the OK button to save the new Account # field.
-
Once the new field has been saved, it will display in the Data pane. Drag the new Account # field into the second position in the Rows field. The full account number will now appear in the first column on the report.
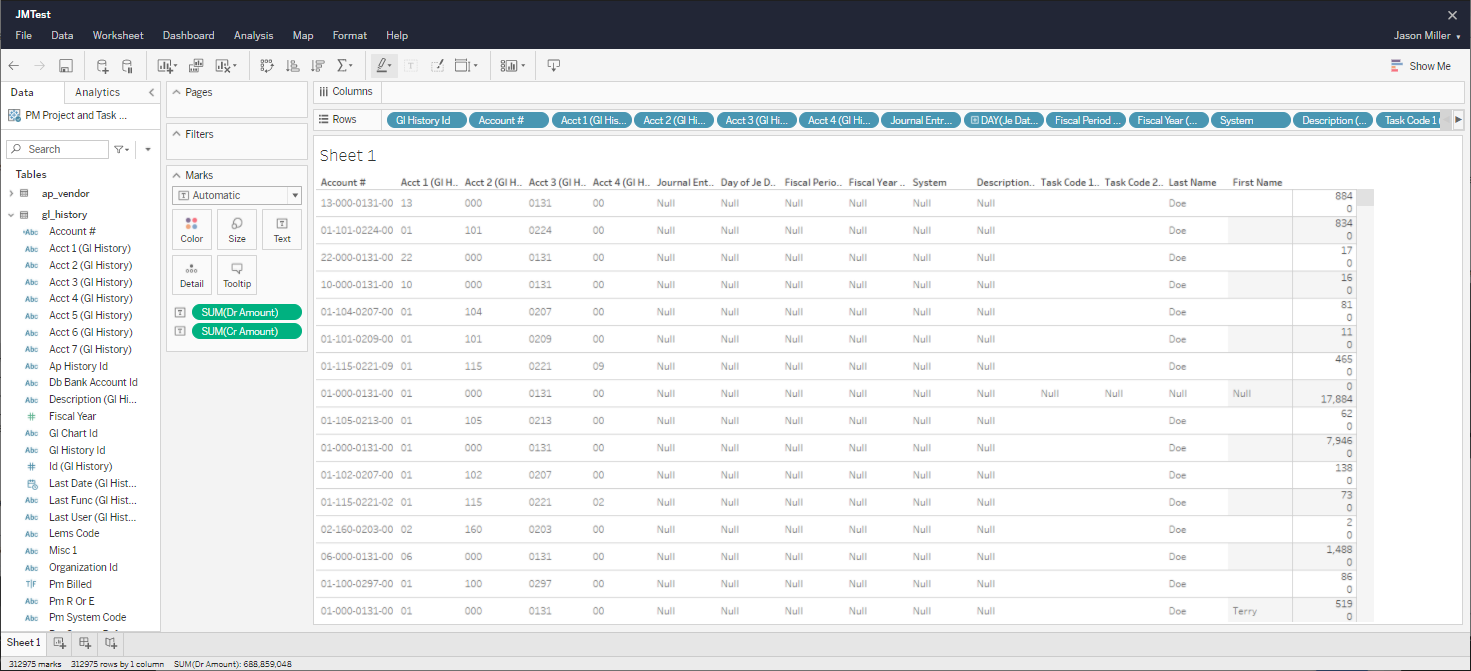
-
Now that the full account number is displayed in the first column on the report, we can remove the individual account sections. These sections can removed by dragging them out of the Rows column and back to the Data pane or by opening the account section drop-down menu and selecting Remove.
-
Once all the account section fields have been removed, the report should look like this:
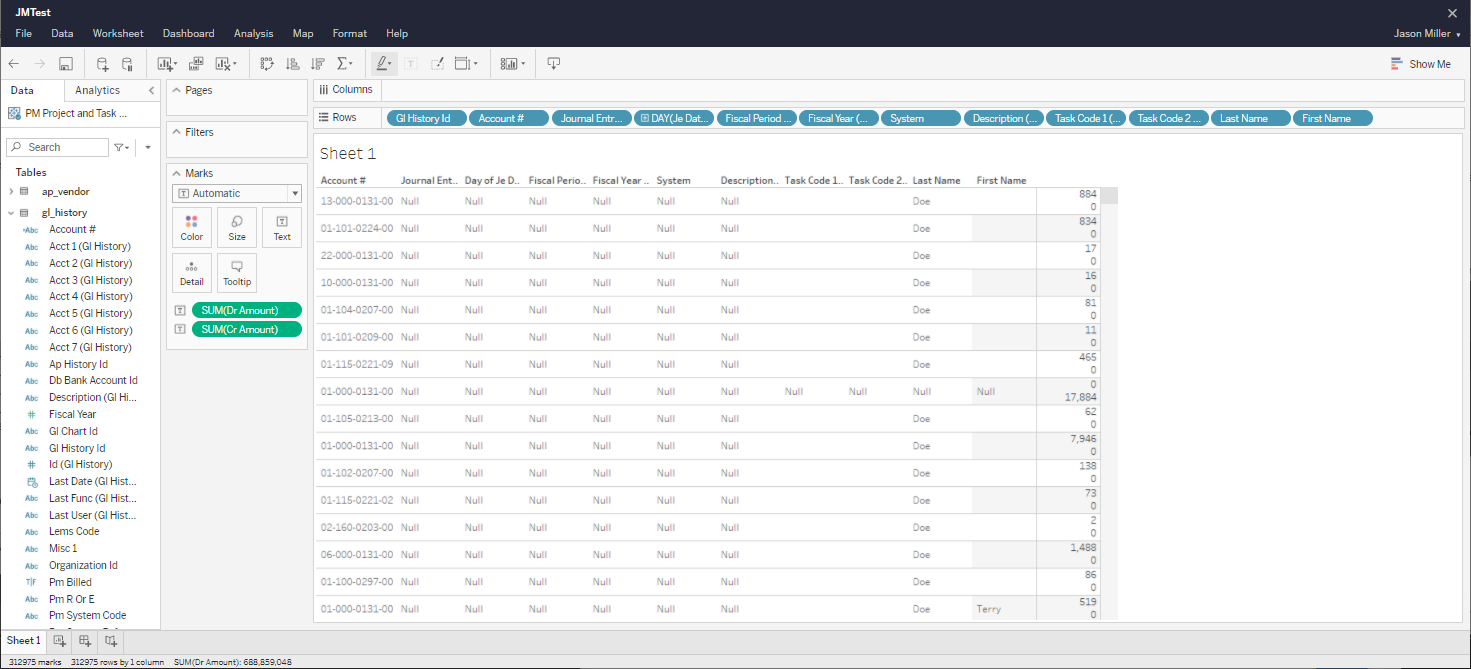
-
For more detailed information on creating calculated fields, see the Tableau help article set Create Custom Fields with Calculations at https://help.tableau.com/current/pro/desktop/en-us/calculations_calculatedfields.htm.
-
Just like the Account Number fields, the Last Name and First Name fields can be combined into a single field.
-
Locate the Last Name field in the ap_vendor table in the Data pane. Click the drop-down menu and select Create > Calculated Field.
-
Add a plus sign, comma and space between single quotation marks, a second plus sign, and the First Name value to complete the calculated field.
-
Name the calculated field Vendor Name and click the OK button to save.
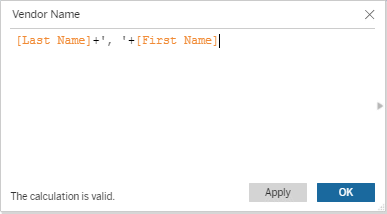
-
Drag the new Vendor Name field into the Rows field and remove the Last Name and First Name fields. The report should now look like this:
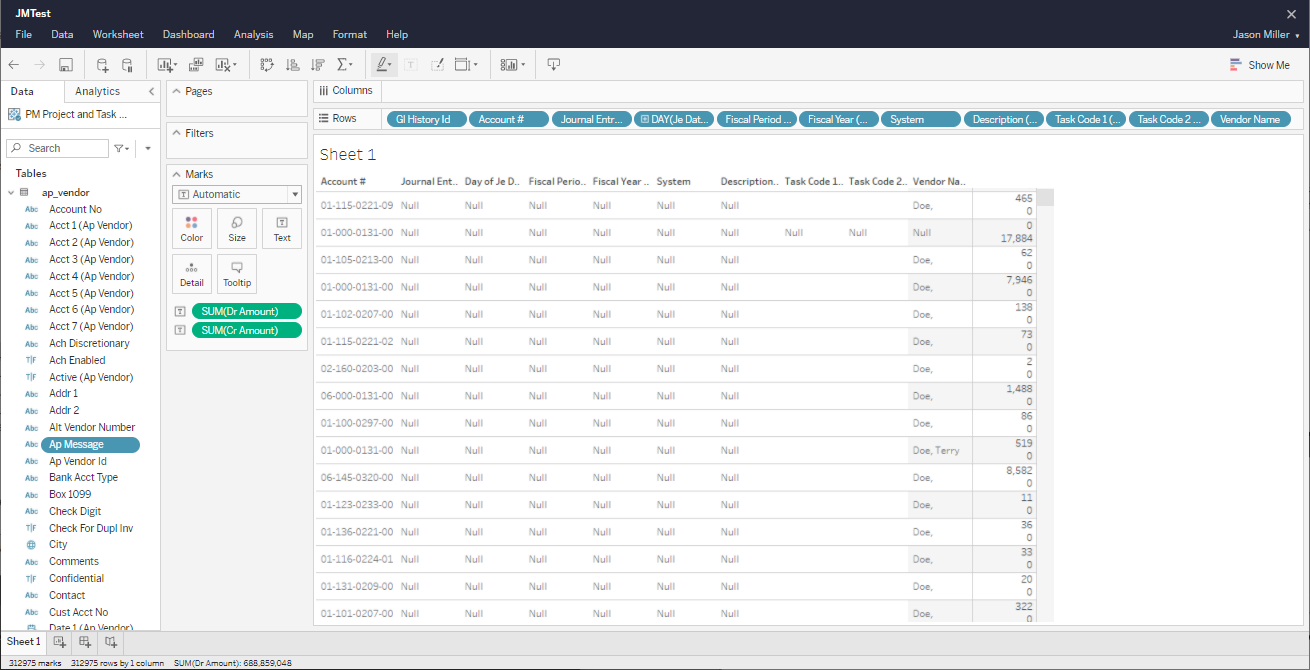
-
The Debit Amount and Credit Amount values are currently displayed as stacked values in the same column with a column header.

-
In order to display these values in separate columns, we need to make a few changes to how Tableau displays this data. We will do this using Measure Names, which is the collection of all the measures in the Rows field, and Measure Values, which is the collection of the two values, Debit Amount and Credit Amount, in the Marks section.
-
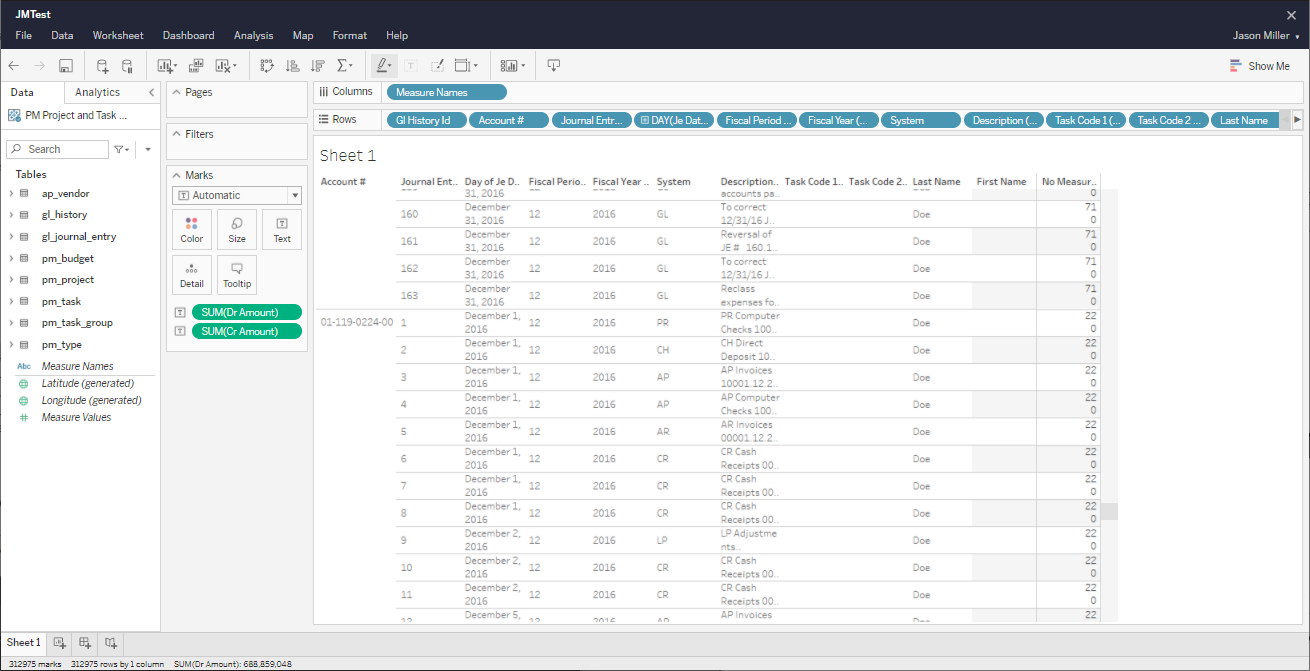
The first step is to drag the Measure Names field from the bottom of the Data pane to the Columns field.
-
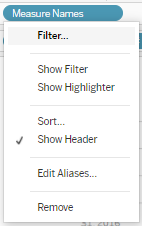
The Measure Names field includes all the fields displayed in the Rows field. Once the Measure Names field has been added to the Columns field, click the drop-down menu and select Filter.
-
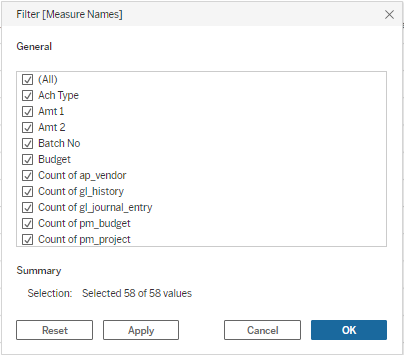
This will open the Filter [Measure Names] window.
-
Deselect all toggles by deselecting the (All) toggle. After selecting only the Debit Amount and Credit Amount toggles, click the OK button.
-
Next we need to remove the Debit Amount and Credit Amount fields from the Marks section by dragging them back into the Data pane.
-
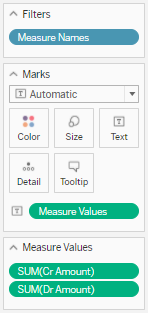
Now we can replace them with the Measure Values field by dragging it from the Data pane to the Text field of the Marks section.
-
This Measure Values collection includes all the data fields Tableau recognizes as measure values. But since we filtered the Measure Names collection to only display the Debit Amount and Credit Amount, those will be the only values displayed.
-
-
After adding the Measure Values field to the Marks section, you will see a new Measure Values section below the Marks section.
-
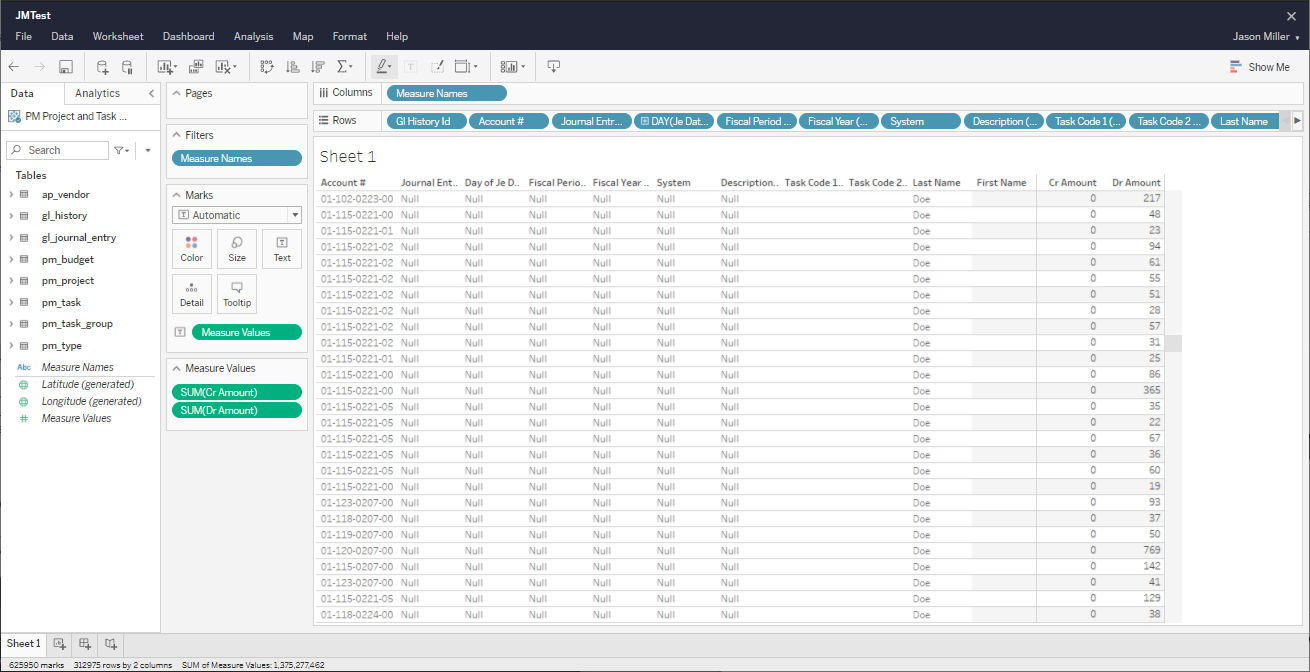
The report should now display the Debit Amount and Credit Amount in separate columns.
-
The last thing we need to do for the Debit Amount and Credit Amount fields is to change the display format.
-
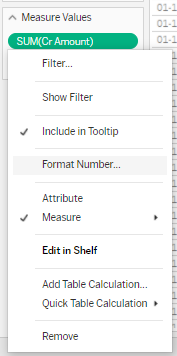
Click the drop-down menu next to the Credit Amount or Debit Amount field and select Format Number.
-
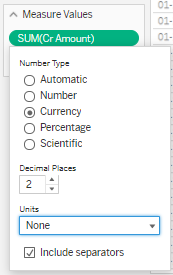
This will open the Format Number window.
-
From here you can select Currency, set the decimal place value, specify units such as K or M in order to save space when reporting on large numbers, and specify whether or not to use comma separators.
-
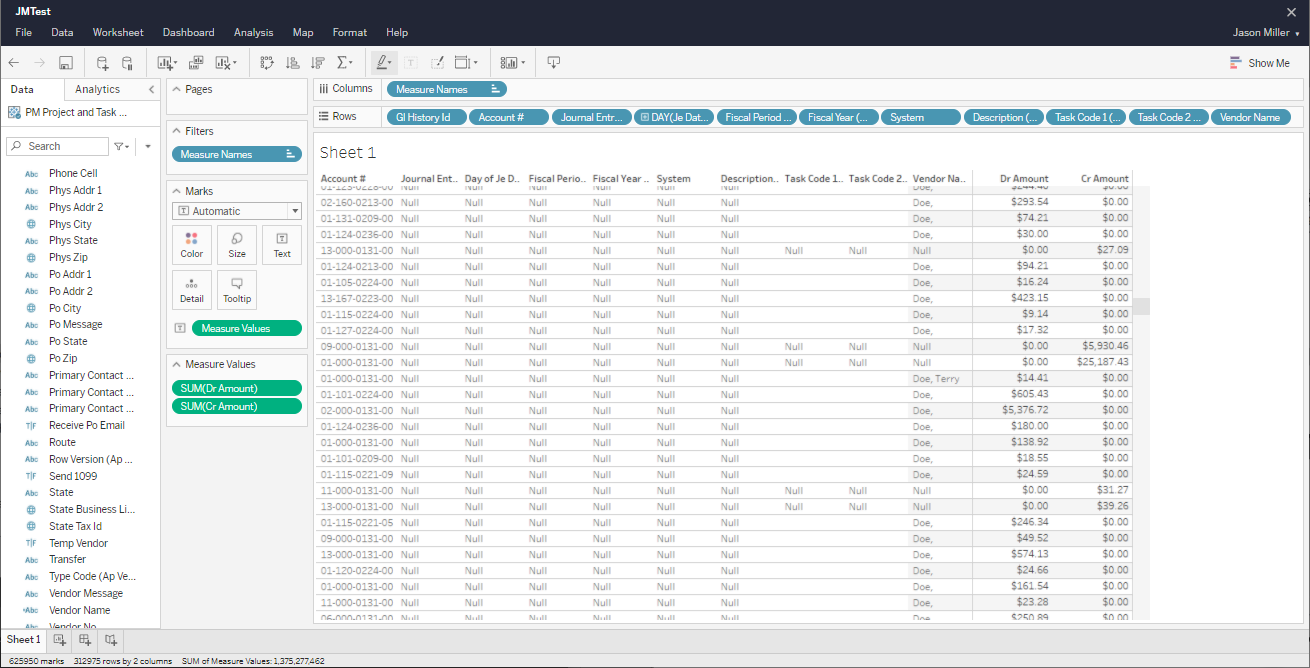
Follow these steps for the other amount and the report should look like this:
-
Now that we have our Debit Amount and Credit Amount values in separate columns, we can add totals to the report.
-
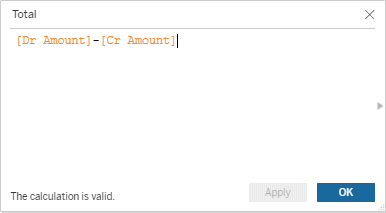
We will first create a total for each line by subtracting the Credit Amount from the Debit Amount in a Calculated Field.
-
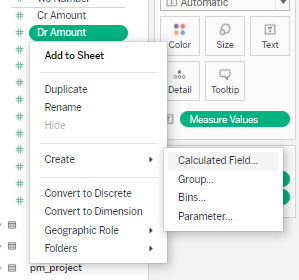
Click the drop-down menu on the Debit Amount field and select Create > Calculated Field.
-
This will open the Calculated Field window where you can set up the Debit Amount minus Credit Amount calculation.
-
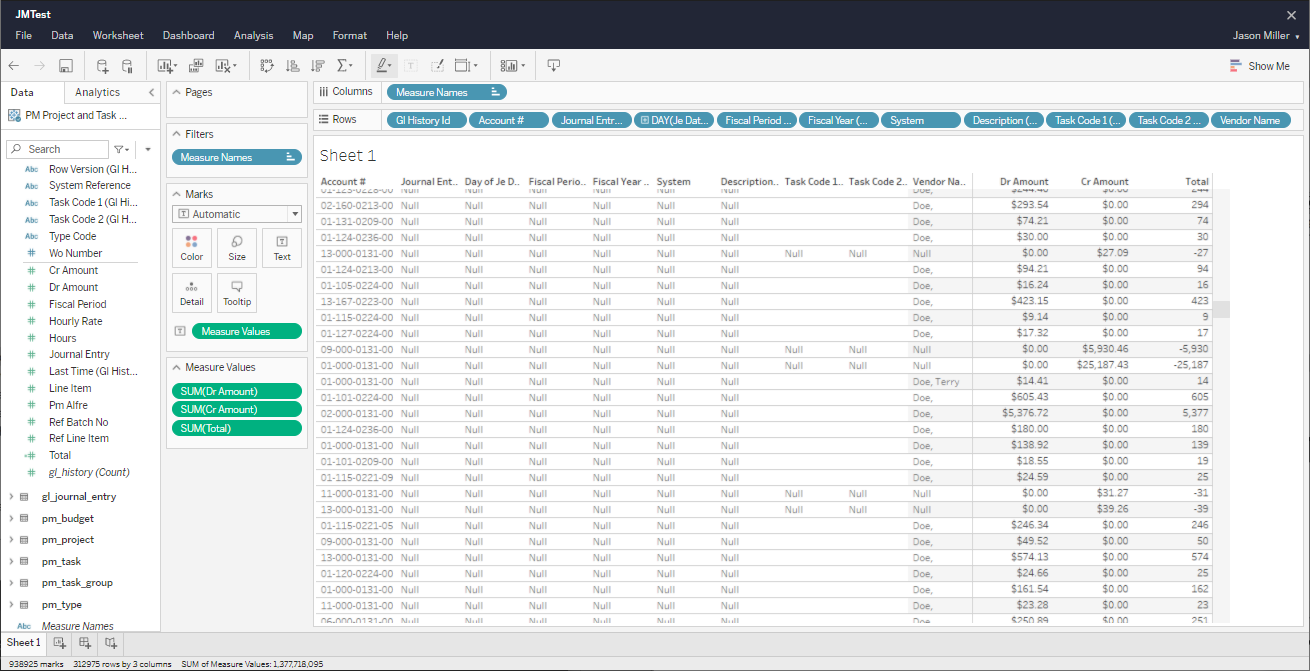
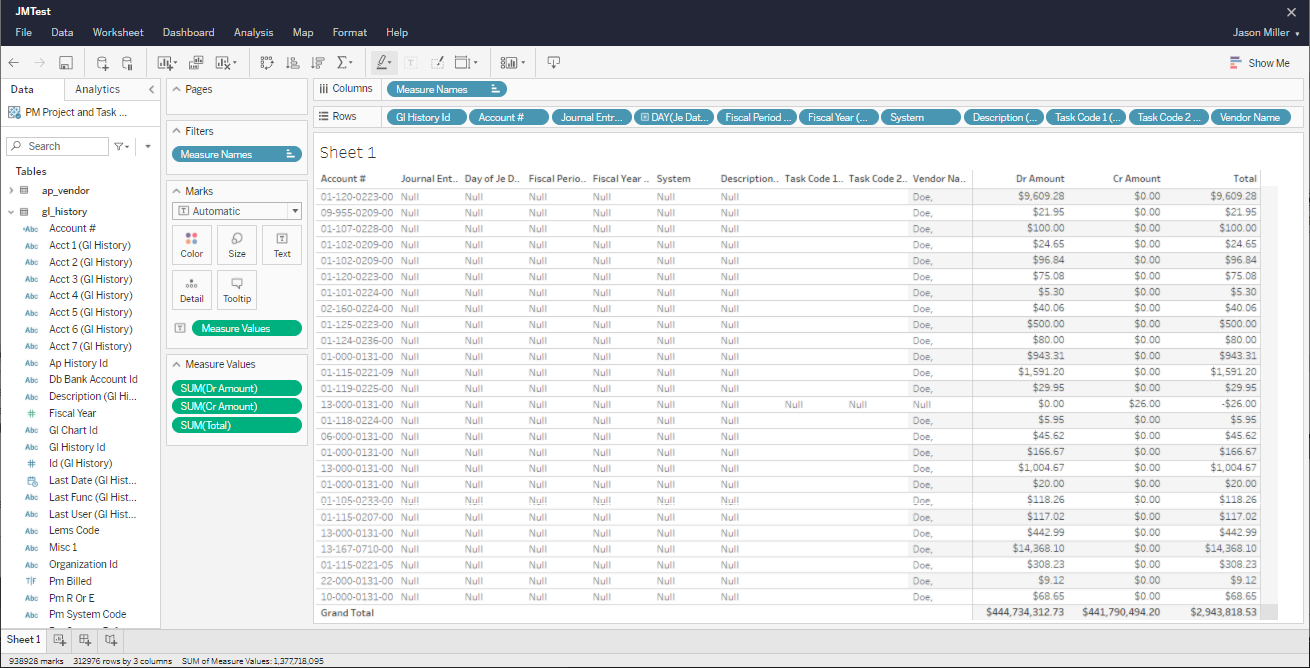
After setting up the Total calculated field, drag that field to the Measure Values section. Your report should now include a the Total column displaying the total for each line.
-
We can also add a grand total to the report.
-
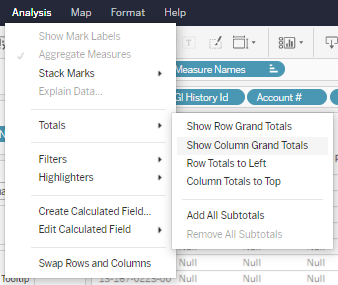
Click the Analysis tab in the main Tableau menu and select Totals > Show Column Grand Totals.
-
This will add a grand total the bottom of the Debit Amount, Credit Amount, and Total columns.
-
Use the drop-down menu on the Total field in the Measured Values section and use the Format Number option to format the number as currency. The Grand Total value will now be properly formatted.
-
If your report includes a very large data set, you can choose to display the Grand Total at the top of the report by selecting Totals > Column Totals On Top.
-
In order to meet the initial report requirements, we need to add two filters to the report.
-
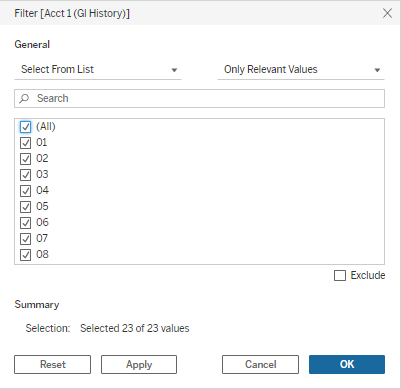
First we need to include a Fund filter. The fund is the Account 1 section of the account number, so drag the Account 1 (GL History) field from the gl_history table in the Data pane to the Filters section. This will open the Filter [Acct 1 (GL History)] window.
-
Confirm the (All) toggle is selected and click the OK button. Now the Acct 1 (GL History) field will display in the Filters section.
-
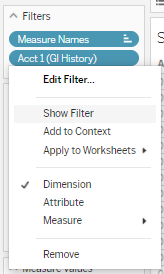
In order to enable the filters for the report reader, click the drop-down menu on the Acct 1 (GL History) field in the Filters section and select Show Filter.
-
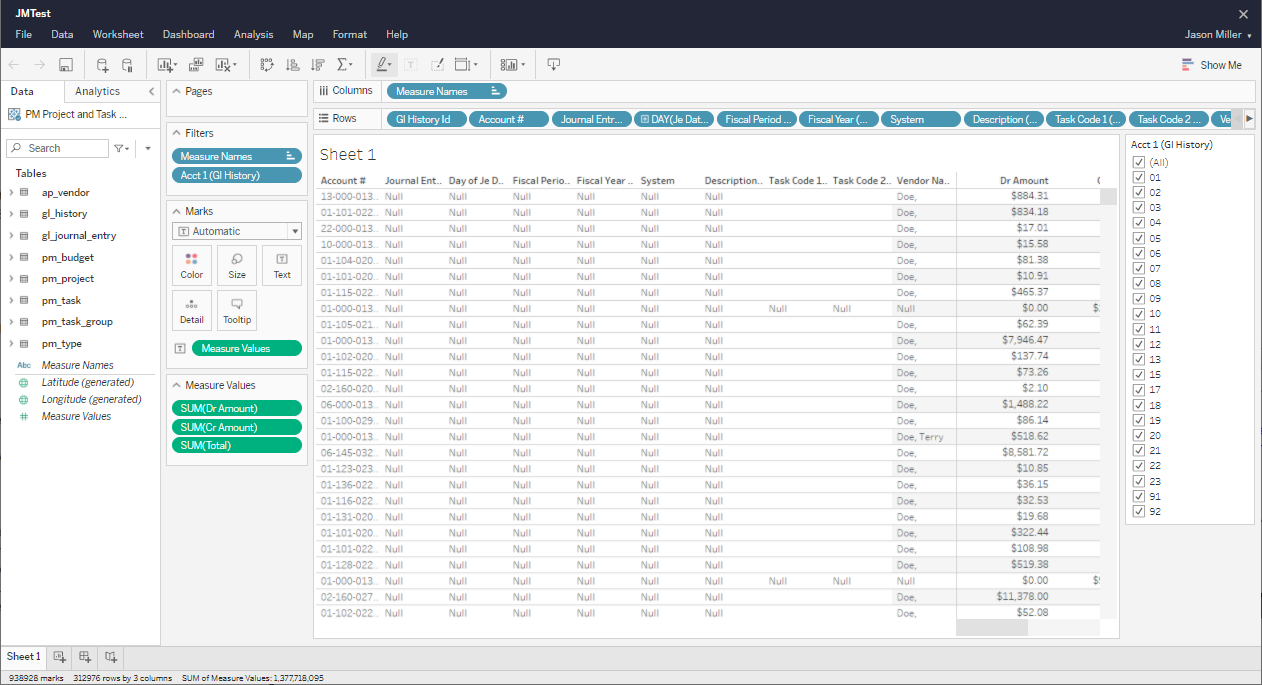
The Acct 1 (GL History) filter will now be displayed to the right of the report data.
-
Once a filter has been added to the report, you can edit how that filter will display the data filtering options.
-
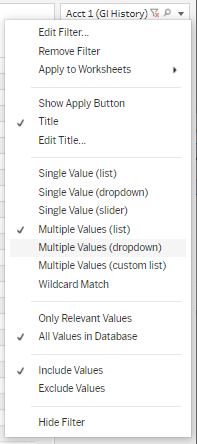
Click the small down arrow to open the filtering options drop-down menu.
-
There are many data filtering options in the drop-down menu, each offering advantages and disadvantages depending on the amount of data being filtered and how you want the reader to interact with the filter. In this case, we want to use the Multiple Values (drop-down) option.
-
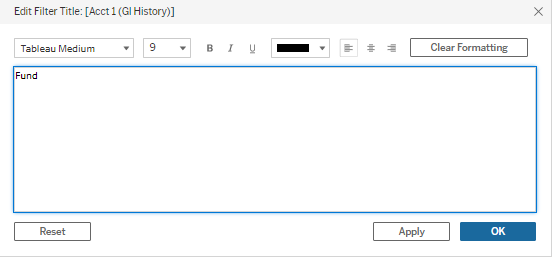
We can also use the drop-down menu on the filter to change the filter name. Click Edit Title in the drop-down menu to open the Edit Filter Title window.
-
Change the filter title to Fund and click the OK button.
-
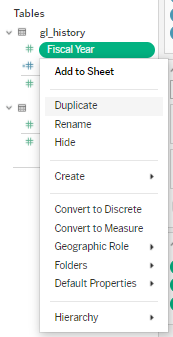
In order to add a Fiscal Year filter, you will need to create a copy of the Fiscal Year field in the gl_history table and then convert that field from continuous to discrete.
-
Click the drop-down next to the Fiscal Year field in the gl_history table and select Duplicate.
-
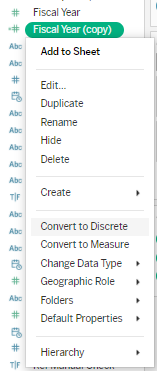
A new field will be displayed as Fiscal Year (copy). Click the drop-down menu on that Fiscal Year (copy) and select Convert to Discrete.
-
The Fiscal Year (copy) field can now be dragged into the Filter section.
-
Repeat the same steps in the Fiscal Year (copy) filter drop-down to show the filter and to include all the fiscal years in the filter options. Once the filter is displayed at the right side of the report, update the filter options and change the title.
-
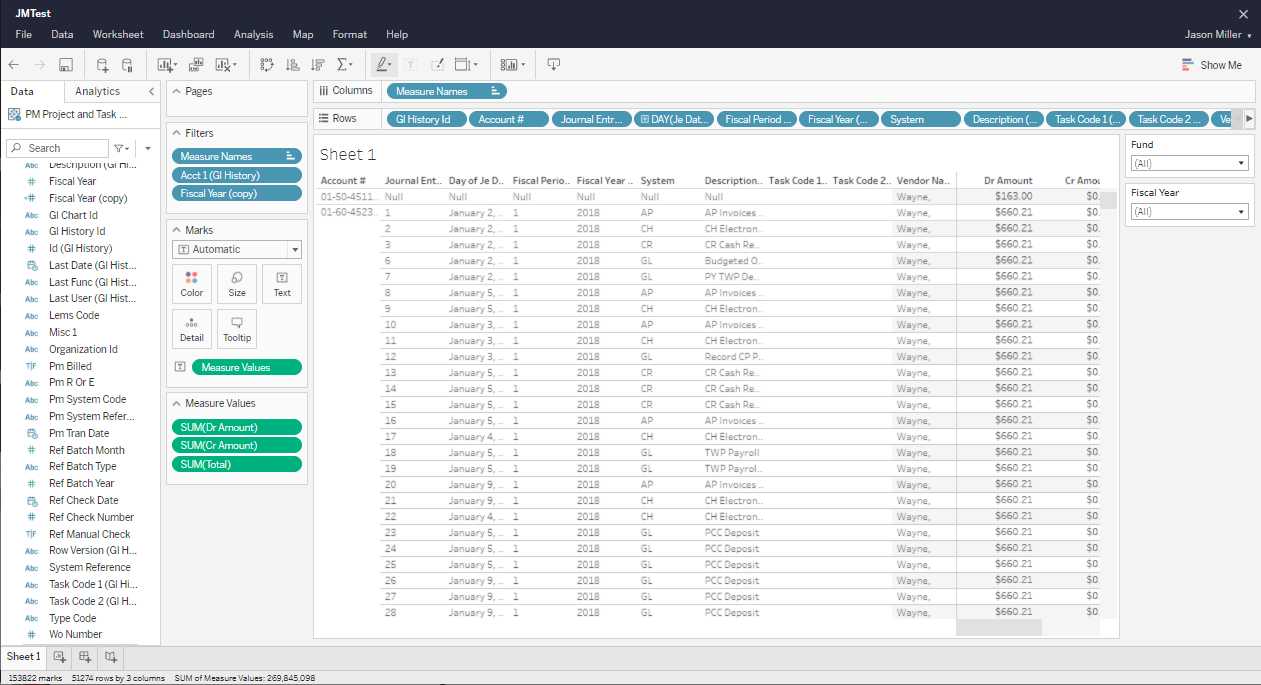
The report will now display the two filter options report readers will be able to use once the report is published.
-
This example report provides Springbrook Project Management data for reconciliation back to the General Ledger. As such, the transactions included in the report need to be associated with a task code. In order to ensure that only those transactions are included, and to clean up the report by removing null values in the task code columns, we need to add a filter set up to exclude null task codes.
-
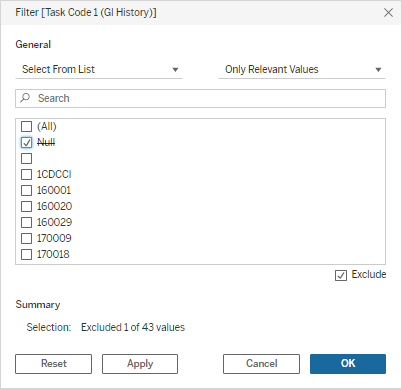
The first step is to add Task Code 1 to the Filter section. This will open the Filter [Task Code 1] window.
-
As the goal of this filter is to ensure all the report transactions are associated with a task code and to exclude null task code values, you need to deselect all the filter values by deselecting the (All) toggle, check the Exclude toggle, and then select only Null in the filter values.
-
By only excluding Null values, you are also ensuring any new task codes created in the future will also be included in this report.
-
You do not need to select Show Filter on this filter as the goal is to exclude null task codes, not to allow readers to filter by task code.
-
-
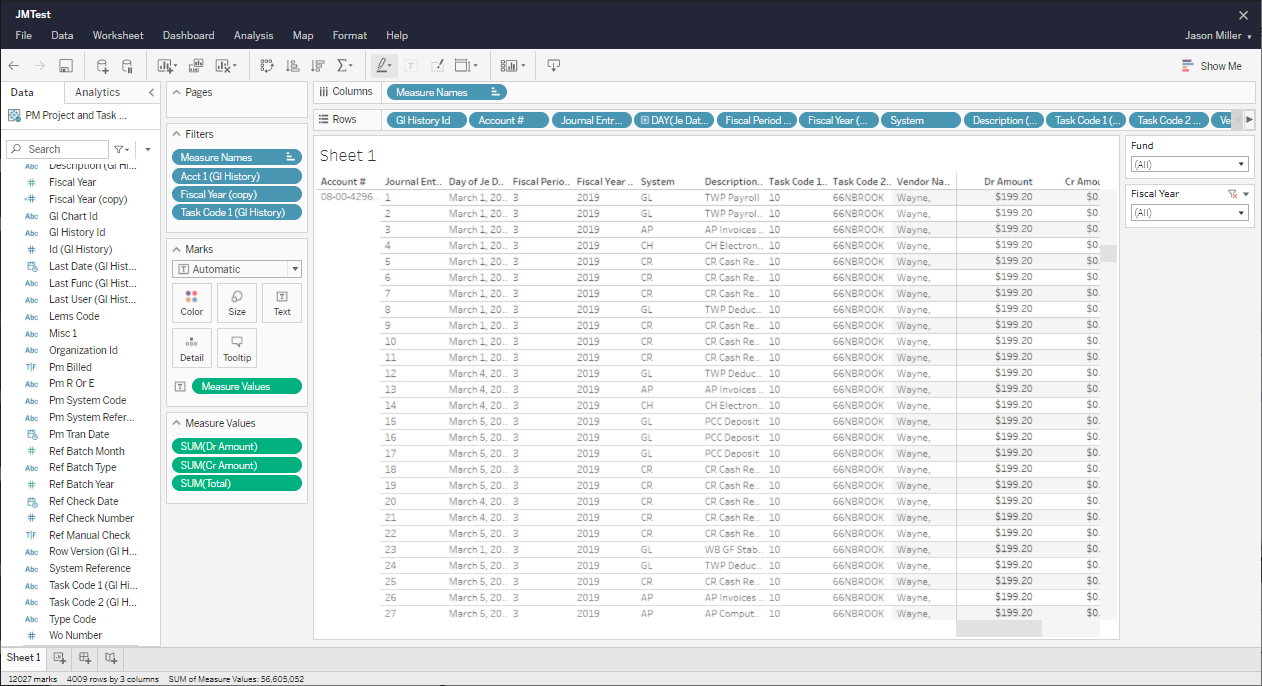
The report should now only display transactions with non-null task code values.
-
The final step in refining the report is to add a title that automatically updates to reflect the user-applied filters.
-
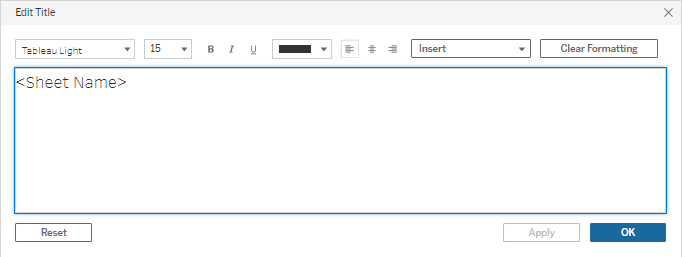
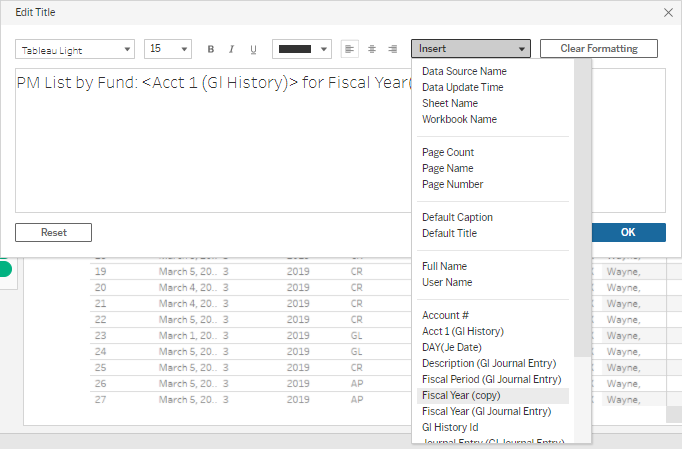
Double-click on the title of the report to open the Edit Title window.
-
In this window you can change the content and the formatting of the title.
-
For this report, we will be changing the title to "PM List by Fund: for Fiscal Year(s): "
-
We can then use the Insert menu to insert <Account 1 (GL History)> after Fund: and <Fiscal Year (copy)> at the end of the title.
-
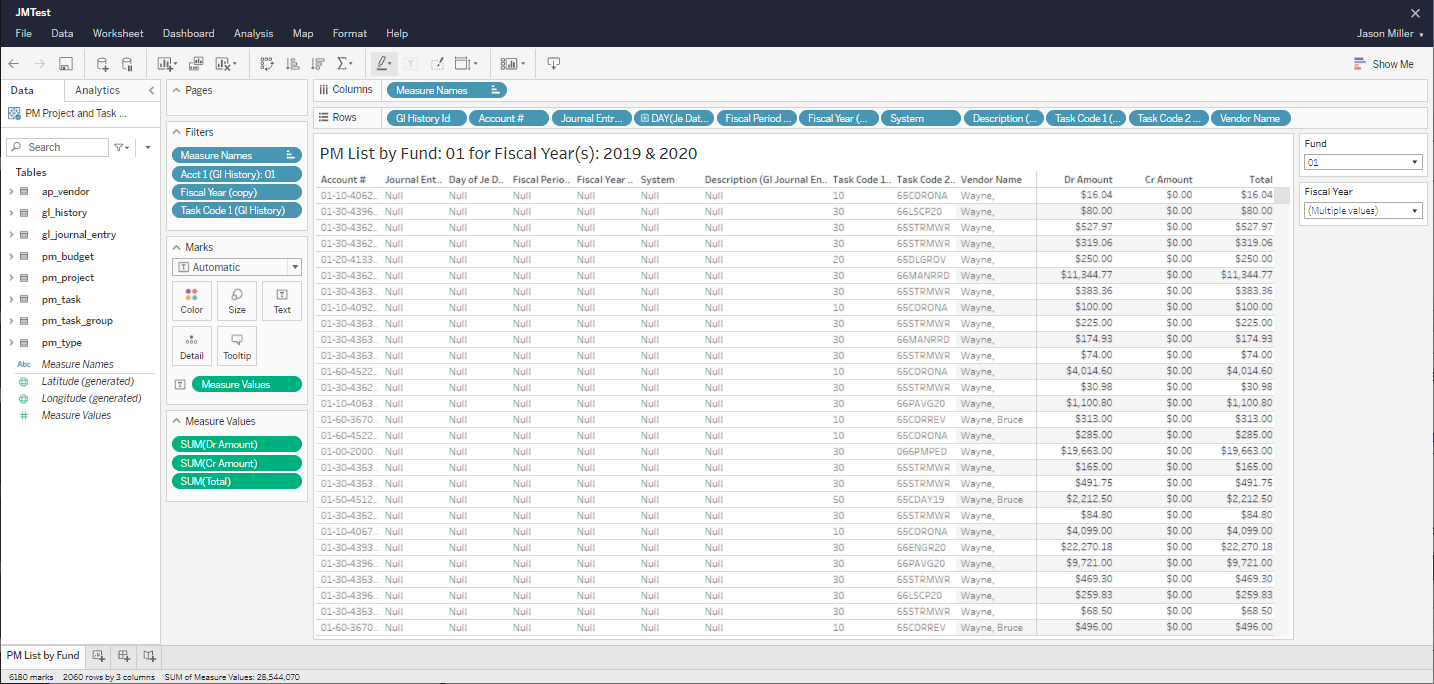
The <Account 1 (GL History)> and <Fiscal Year (copy)> fields will automatically populate with the filter selections specified in the Fund and Fiscal Year filters. If a reader makes their filter selections and then prints the report, the report title will reflect those filter selections.
-
For example, this report is set up to display only those transactions from Fund 01 during 2019 and 2020.
-
When users open the report the filters will default to the last saved settings. If you would like both set to All by default, update the filters and save the report.
-
You can also update the sheet name users will see when opening your report by double-clicking Sheet 1 in the bottom-left corner of the window.
Your report is now ready to be shared and accessed. For more information on administering reports, see Springbrook Analytics Administration.