AP> Computer Checks
Computer Checks
Summary
The Computer Checks process is used to generate checks from Accounts Payable module invoice line items. Only
invoice line items that have been committed in an AP Invoices batch can be paid
using the Computer Checks process (you cannot add invoices that are in an open
AP Invoices batch to a Computer Checks batch). If the vendor attached to the
invoice line item is set up to use Electronic AP, a check will not be generated
by the Computer Checks process, but a transaction will be created in a batch in
the Clearing House module Electronic AP process to create the ACH transaction to
pay the vendor.
If you have generated a check outside of the application (for example, you
have physically written a check to a vendor and have not recorded the payable,
expense or payment of that invoice in the application), use the Manual Checks
process (AP> Manual Checks) to enter the manual check. The Manual Checks process
will record the payment and the expense, but it will not generate a check.
Click here for information on
the Manual Checks process.
If the Accounts Payable module is set up to create a
positive pay file, the Export step on the Computer Checks process will be a
required step. A positive pay file is a file that contains the checks that have
been generated in the Computer Checks batch. This file is sent to your bank so
that they can verify the checks for accuracy as the checks are cleared. The
format of the positive pay file will vary depending on the bank they are being
sent to, so the Export window is often a customized window. The AP module is
set up to use positive pay on the Setup window (AP> Utilities> Setup> Checks tab> Export Positive Pay File toggle).
Once a Computer Checks batch that contains physical checks is committed, un-cleared checks will be created in the Bank
Reconciliation module (BR> Clear Transactions). When you get your bank
statement, you can clear the checks in the Bank Reconciliation module to update
the balance of the bank account the checks were drawn on.Click here for
information on the Clear Transactions process.
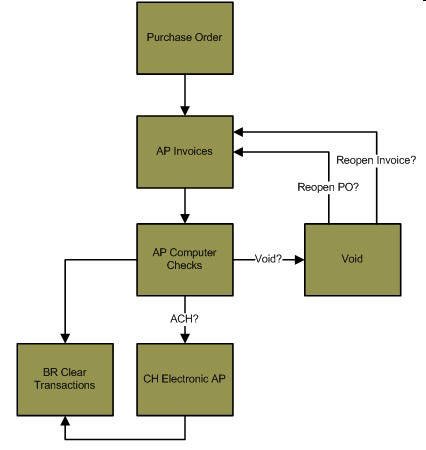
Flowchart
The objects in the diagram below represent processes in the application. Click on an object for information about the process.
Related Links
Click here for an overview of Electronic AP.
Bank information is attached to the Detail tab of the Vendor Maintenance window.
Click here for information on bank account maintenance.
Click here for information on the AP module Setup window.
Step by Step
1 Open or create a new Computer Checks batch. 
- Select the Computer Checks palette in AP> Computer Checks. This will expand the Computer Checks
palette and display the steps of the Computer Checks process.
- Modify an existing batch or create a new Computer Checks batch.
- The Batch Month and Batch Year of the Computer Checks batch is used for
reference only and is not necessarily the fiscal month
and year the transactions in the batch will be posted to. The fiscal period the
transactions are posted to is determined by the journal Entry date entered when
creating the GL Distribution report.
- Highlight the batch in the batch number drop-down menu on the Computer Checks palette and press DELETE to delete
a batch. Any uncommitted computer checks in the batch will be deleted.
2 Complete the Settings step.
- The Settings step is used to select the bank account the checks generated in the batch will be drawn from.
- Open the Settings window (AP> Computer Checks> Settings).
- The Pay From field is used to select the bank account the checks will be paid from. Click the Pay From field label to select a bank account from a list or enter
the bank account code.
- The Pay From field will default to the default bank account selected
in the AP module Setup window (AP> Utilities> Setup> General tab> Bank Account field).
- The Pay From field will not be enabled if you are using the multi-bank checking feature. The bank
account used to pay each invoice line item will be selected based on the GL
account attached to the invoice line items and the bank accounts attached to
those GL accounts.
- If you are using blank check stock (AP> Utilities> Setup> Checks> Use blank check stock toggle), the name of the bank associated with
the bank account will display at the top of the checks generated on the
Checks step (AP> Computer Checks> Checks).
- Bank accounts are created and maintained using the Bank Account Maintenance window (SS> Maintenance> Bank
Account).
- Press ENTER or click the Save icon
 when complete.
4 Select how the checks will be generated.
- After the Selected toggle is checked on each invoice line item you would like to pay in the batch, use the
Order column to set how the checks will be generated.
- If there are ACH transactions in the Computer Checks batch, the ACH transactions in the batch will also be
affected by the grouping. For example, if the invoice line items of a vendor are
grouped onto two separate checks, two separate ACH
transactions are created.
- By default, all invoice line items attached to the same vendor will be grouped onto the same check. If you would
like invoice line items to display on separate checks, group the checks for the
vendor using the Order column.
- Invoice line items with the same vendor and Order value will display on the same check. Change the value
in the Order column to group invoice line items onto separate checks. For
example, if you are paying three invoice line items of the same vendor and would
like two of them grouped onto a single check, set the Order value of one
of the invoice line items to 1, and set the remaining two line items to 2.
- The value in the Order column is modified using the Increase and Decrease icons at the top of the window.
- Press ENTER or click the Save icon when complete to save the selected invoices.
- If you are using multi-bank checking and the general ledger account attached to the selected AP invoice is
not assigned to a bank account in the correct fiscal year, you will receive an
error. You can attach bank accounts to general ledger accounts (AP> Utilities>
Associate Banks).
5 Print a proof list.
- The Proof List displays the invoices that are selected for payment in the Computer Checks palette, how those
invoice line items are grouped onto checks, and the total number and amount of
checks that will be created. The report will also display if the invoice will be
paid using an ACH instead of a physical check.
- Open the Proof List window (AP> Computer Checks> Proof List).
- The Sort By drop-down menu is used to select how information will display on the report.
- Select Vendor Name if you would like the invoices to display in alphabetical order based on the vendor name. The
vendor name is the Last Name field on the vendor record (AP> Maintenance>
Vendor> General tab> Last Name field).
- Select Vendor Number if you would like the invoices to display in alphabetical order based on the vendor number.
- Click the Print icon
 to process the report immediately or enter a date and time in the field next to the Print icon to schedule the report to generate at a later time.
You can view the progress of the report on the Job Viewer window (SS> Utilities> Show Scheduled Jobs). Click here for information on the Jobs Viewer window.
to process the report immediately or enter a date and time in the field next to the Print icon to schedule the report to generate at a later time.
You can view the progress of the report on the Job Viewer window (SS> Utilities> Show Scheduled Jobs). Click here for information on the Jobs Viewer window.- Click the Print icon drop-down menu and select Print Preview to preview the report before printing.
- Click the Print icon drop-down menu and select Excel to export the report data to an Excel spreadsheet as unformatted data.
- Click the Print icon drop-down menu and select Excel (Formatted) to export the report data to an Excel spreadsheet that includes much of the Springbrook formatting found on the printed version of the report.
- Once the report is generated, you can also display the report using the View Reports window (SS> Utilities> View Report). Click here for information on the View Reports window.
- All of the invoice line items that were grouped onto the same checks will be totaled together, and the report will
display the total of each check. If the grouping is incorrect and invoice line
items should be grouped onto other checks, return to the Select Invoices step
(AP> Computer Checks> Select Invoices) and use the Order column to change
the grouping of the invoice line items.
- The general ledger account number on the Proof List Report is the GL account attached to the invoice.
- If the invoice line item will be paid using an ACH transaction instead of a physical check, ACH Enabled: True
will display on the report. Invoice line items that are paid using an ACH
transaction will not generate a physical check (AP> Computer Checks> Checks) or a journal entry line item in the batch
(AP> Computer Checks> GL Distribution).
When the Computer Checks batch is committed, a transaction will be created in
the CH module Electronic AP process to create the ACH check. The journal
entry will be created when the Electronic AP transaction is processed (CH>
Electronic AP> GL Distribution).
- If you would like to generate a physical check rather than an ACH,
disable the ACH feature on the vendor record attached to the invoice
(AP> Maintenance> Vendor> Details tab> ACH Status drop-down menu), and then
return to the Select Invoices step on the Computer Checks batch (AP>
Computer Checks> Select Invoices). When an invoice is added to the batch
on the Select Invoices step, the system checks whether the vendor on the
invoice is set up to use electronic AP and then sets that value. That is
why you have to return to the Select Invoices step if you disable ACH
transactions on the AP vendor.
- ACH checks are included in the Total Number of Checks and Total for Check Run amounts.
6 Print the checks.
- Open the Checks window (AP> Computer Checks> Checks).
- The format of the checks that are generated depends on how the Accounts Payable module is set up (AP> Utilities>
Setup> Checks tab). Click here for information on the AP module Setup window.
- The Checks window is used to select the information that will display on the checks generated in the batch.
- The Check Date field is used to enter the check date of the checks generated in the batch.
- The Check Date will also be applied to ACH checks that are processed in this batch.
- The check date does not determine the fiscal period/year or journal entry date of the checks processed in the
batch. The journal entry date is set when the GL Distribution Report is
generated (AP> Computer Checks> GL Distribution).
- The Check Date field is a filter option on most Accounts Payable module reports.
- The First Check Number field displays the check number that will be assigned to the first
check in the batch. The first check number is pulled from the last check number
that was used on the bank account.
- This field does not apply if you are using multi-bank checking.
- The Check Title 1 and Check Title 2 fields are used to enter titles on the check.
These fields will only display on the checks if the Accounts Payable module is
set up to display them on the checks (AP> Utilities> Setup> Checks tab> Print
titles on checks toggle). If you have a custom check, these fields
may not display.
- Check titles will only be displayed on standard check stubs. When printing long check stubs, check titles will not be displayed.
- The Stub Message will display at the top of the stub above the detail line items on long check stub
formatted checks. The stub message will not display on standard checks.
- The Layout field is used to select which configurable check will be used for the batch.
- Click the Print icon to process the report immediately or enter a date and time in the field next to the Print icon to schedule the report to generate at a later time.
You can view the progress of the report on the Job Viewer window (SS> Utilities> Show Scheduled Jobs). Click here for information on the Jobs Viewer window.
- Click the Print icon drop-down menu and select Print Preview to preview the report before printing.
- Click the Print icon drop-down menu and select Excel to export the report data to an Excel spreadsheet as unformatted data.
- Click the Print icon drop-down menu and select Excel (Formatted) to export the report data to an Excel spreadsheet that includes much of the Springbrook formatting found on the printed version of the report.
- Once the report is generated, you can also display the report using the View Reports window (SS> Utilities> View Report). Click here for information on the View Reports window.
- ACH checks will not display on the report. If you are missing a check in
the batch, the vendor attached to the check may be set up to use electronic
AP (AP> Maintenance> Vendor> Detail tab> ACH Status
drop-down menu). If you change the ACH status of an AP vendor, you will have
to return to the Select Invoices step and resave the invoices in the batch
in order for the new selection to take effect.
7 Print the Check Register Report.
- The Check Register Report will display the list of checks that were generated in the Computer Checks batch. The
report will display the check numbers, vendor name and check amount. If you
generate the report in Detail format, the report will also display all of the
invoice line items that each check is paying.
- Open the Register window (AP> Computer Checks> Register).
- The Report Type drop-down menu is used to select the information that will display on the report.
- The Summary version of the report displays the check number, vendor number, vendor name, check date and the
amount paid on each check.
- The Detail version of the report displays all of the information that is on the summary report, but it also
includes the invoice line items that are paid on each check.
- Enter the first Check Number and press TAB. The check numbers will increment to the end of
the list.
- Click the Print icon to process the report immediately or enter a date and time in the field next to the Print icon to schedule the report to generate at a later time.
You can view the progress of the report on the Job Viewer window (SS> Utilities> Show Scheduled Jobs). Click here for information on the Jobs Viewer window.
- Click the Print icon drop-down menu and select Print Preview to preview the report before printing.
- Click the Print icon drop-down menu and select Excel to export the report data to an Excel spreadsheet as unformatted data.
- Click the Print icon drop-down menu and select Excel (Formatted) to export the report data to an Excel spreadsheet that includes much of the Springbrook formatting found on the printed version of the report.
- Once the report is generated, you can also display the report using the View Reports window (SS> Utilities> View Report). Click here for information on the View Reports window.
8 Generate a Positive Pay file.
- The Export step on the Computer Checks process is used to generate a positive pay file. A positive pay file is
an export file that contains all of the checks that were generated in the batch.
This file is sent to your bank so that the bank can verify the checks as they
are cleared. The format of the positive pay file will vary depending on the
format requested by your bank, so this is often a customized window.
- The standard positive pay file format is:
| 010840880220 000000001500000065980009222010 |
| 020840880220 0000000001000000659800 |
- The Numbers on the first line correspond to:
- 01 = indicates the beginning of the individual transaction line
- 0840880220 = Bank Account
- 0000000015 = Check Number
- 000000659800 = Amount
- 09222010 = Check Date
- The numbers on the second line correspond to:
- 02 = indicates the beginning of the total line
- 840880220 = Bank Account
- 0000000001 = Total Number of Checks
- 000000659800 = Total Amount
- If the file contains any electronic payments, the total electronic payment amount will be listed on a single line. The check number will be 0000000000 and the date will be the date the positive pay file was created. The final line of the file will include this total electronic payments amount in the total file amount.
- The Export step will only display on the Computer Checks palette if the
AP module is set up to create the positive pay file (AP> Utilities> Setup> Checks
tab> Export Positive Pay File toggle).
- Select Export from the Computer Checks palette. This will open the Export window.
- The Configuration field is used to specify the configuration for the export file.
- Click the Confirm icon
 to generate the positive pay file immediately or enter a date and time in the field next to the Confirm icon to schedule the positive pay file to generate at a later time.
You can view the progress of the export on the Job Viewer window (SS> Utilities> Show Scheduled Jobs).
to generate the positive pay file immediately or enter a date and time in the field next to the Confirm icon to schedule the positive pay file to generate at a later time.
You can view the progress of the export on the Job Viewer window (SS> Utilities> Show Scheduled Jobs).
- Once the export has finished processing, the Export Settings window will open. This window is used to specify the export path for the positive pay file.
- Check the Open toggle if you would like to open the exported file after it is saved locally.
- Enter the export path location and click the Save icon to export the file to the local path.
9 Print the GL Distribution Report.
- The GL Distribution Report displays the journal entry generated by the Computer Checks process.
- Select General Ledger Distribution from the Computer Checks palette. This will open the GL
Distribution List window.
- Enter a Journal Entry Date. This will determine which fiscal period and fiscal year will be expensed.
- Click the Print icon to process the report immediately or enter a date and time in the field next to the Print icon to schedule the report to generate at a later time.
You can view the progress of the report on the Job Viewer window (SS> Utilities> Show Scheduled Jobs). Click here for information on the Jobs Viewer window.
- Click the Print icon drop-down menu and select Print Preview to preview the report before printing.
- Click the Print icon drop-down menu and select Excel to export the report data to an Excel spreadsheet as unformatted data.
- Click the Print icon drop-down menu and select Excel (Formatted) to export the report data to an Excel spreadsheet that includes much of the Springbrook formatting found on the printed version of the report.
- Once the report is generated, you can also display the report using the View Reports window (SS> Utilities> View Report). Click here for information on the View Reports window.
- The Computer Checks process will create the following journal entry:
|
GL Account used in transaction
|
Debit
|
Credit
|
|
AP module accounts payable account (AP> Utilities> Setup> General tab> Payable
field) – the fund will be pulled from the fund on the GL account
attached to the invoice line item being paid
|
XXX
|
|
|
GL account attached to the bank account selected in the Setting step (SS> Maintenance> Bank
Account) – this is the bank account that is being used to pay the checks.
The fund will be pulled from the fund on the GL account attached to the
invoice line item being paid.
|
|
XXX
|
- ACH checks that will be processed in an Electronic AP batch (CH> Electronic AP) will not create
journal entry line items in the Computer Checks batch. The ACH checks will
generate a journal entry when they are processed in the Electronic AP batch.
If there are only ACH checks in the Computer Checks batch, no distribution
will be created in the batch.
10 Commit the Computer Checks batch.
- Select Commit from the Computer Checks drop-down menu. This will open an information window.
- Press ENTER or click the Confirm icon to commit the checks.
- If any of the checks are attached to vendors that have been designated as Electronic AP vendors, the Commit step
will create an Electronic AP batch in the Clearing House module that contains
the electronic checks.
- The Commit step creates un-cleared Bank Reconciliation module checks. When you receive your bank statement, use the
Clear Transactions process (BR> Clear Transactions) to clear the check. ACH
checks that will be processed in the Electronic AP process will not be added to
the Bank Reconciliation module until the transactions are processed in the Clearing
House module.
Springbrook Software
® All Rights Reserved 2017
Toll Free Support 866-777-0069