PR> Void checks
Void Checks
Summary
The Void Checks process is used to void paychecks. The process will void the
paycheck and generate a reversing journal entry to reverse the original
transaction. The check will still display on the employee record (PR>
Maintenance> Employee> History tab> History sub-tab), but the
check will display as voided. The original journal entry generated for the
voided check will also still display in the General Ledger module, but the
journal entry created by the Void Checks process will reverse the original
transaction.
If the voided check generated an Accounts Payable module invoice (for
example, if there is a benefit or deduction on the check that is paid to an AP
module vendor), the Void Checks process will not create adjustments for those
transactions. You will have to go into the Accounts Payable module and manually
void those invoices (AP> Void Invoices).
If the voided check generated a Clearing House module Direct Deposit
transaction (CH> Direct Deposit), that direct deposit transaction will be
deleted when the Void Checks batch is committed.
If the voided check has timecard line items that are attached to a PM module
task code, committing the Void Checks batch will reverse the PM module
transaction generated by those timecard line items. Click here for an overview of PM module transactions.
The Void Checks process can only be used to void checks that meet the
following requirements:
- The check is in a committed Computer Checks or Manual Checks batch - You
cannot void a check in an open batch.
- The check has not been cleared using the Clear Transactions process in the
Bank Reconciliation module - If you would like to void a check that has been
processed in a Clear Transactions batch, undo the cleared check (BR> Utilities>
Undo Cleared Checks) and then void the check (PR> Void Checks).
- The check is not in an open Clear Transactions batch in the Bank
Reconciliation module - Checks in an open Clear Transactions batch will not
display in the Void Checks process.
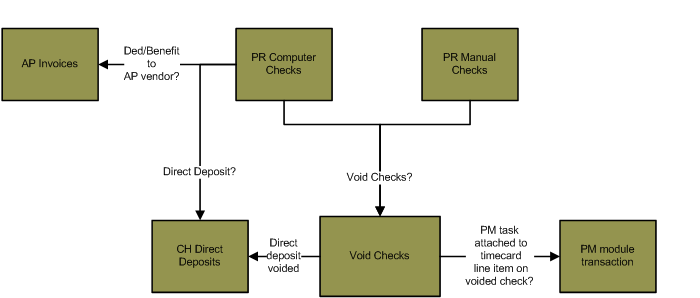
Flowchart
The objects in the diagram below represent processes in the application. Click on an object to view information on a process.
Step by Step
1 Open a Void Checks batch. 
- The Void Checks process is a single batch process, meaning you can process only one batch at a time.
Click here for information on single batch versus multi-batch processes.
- If there is an open batch in the Void Checks process, you will not be able to create a new
batch. If you would like to create a new batch, you can either delete the
existing batch (highlight the batch in the batch number drop-down at the top
of the Void Checks palette and press DELETE), or you can reset the steps on
the palette by returning to the first step of the process. All of the
information in the batch will be overwritten.
- If there are no open batches in the process and you would like to create a new batch, select New
in the batch number drop-down menu at the top of the palette. This will open
the New Batch window. The batch number, batch month and batch year of the
batch will not affect the invoices voided in the process. The batch
information is for reference purposed only.
2 Add checks to the batch.
3 Print a Proof List Report.
- The Proof List displays the checks that are being voided in the batch. This
report will display the check number, check total,
check date and employee name of each check in the batch.
- Open the Proof List window (PR> Void Checks> Proof List).
- Click the Print icon
 to process the report immediately or enter a date and time in the field next to the Print icon to schedule the report to generate at a later time.
You can view the progress of the report on the Job Viewer window (SS> Utilities> Show Scheduled Jobs). Click here for information on the Jobs Viewer window.
to process the report immediately or enter a date and time in the field next to the Print icon to schedule the report to generate at a later time.
You can view the progress of the report on the Job Viewer window (SS> Utilities> Show Scheduled Jobs). Click here for information on the Jobs Viewer window.- Click the Print icon drop-down menu and select Print Preview to preview the report before printing.
- Click the Print icon drop-down menu and select Excel to export the report data to an Excel spreadsheet as unformatted data.
- Click the Print icon drop-down menu and select Excel (Formatted) to export the report data to an Excel spreadsheet that includes much of the Springbrook formatting found on the printed version of the report.
- Once the report is generated, you can also display the report using the View Reports window (SS> Utilities> View Report). Click here for information on the View Reports window.
- The Proof List will display the entire paycheck amount that is being
voided. If a portion of the paycheck has been paid out using direct deposit
transactions, the Proof List will still display the total paycheck. For
example, if $1500 of a $2000 paycheck is paid out using a direct deposit
transaction, the Proof List will display the entire paycheck amount of
$2000.The $1500 direct deposit transaction will be removed from the Clearing
House module Direct Deposit batch (CH> Direct Deposits) when the Void Checks
batch is committed.
- The amount that displays on the Proof List may not match the amount
that displays in the Amount column on the Display window (AP>
Void Checks> Select Checks). The value in the Amount column on the
Display window is the amount of the physical check associated with the
paycheck being voided. The Proof List displays the amount of the
paycheck, including both the physical check and direct deposit check
amount.
4 Print the GL Distribution Report.
- The GL Distribution Report displays the journal entry generated by the Void Checks process to reverse the Payroll
module check. This step is also used to set the journal entry date of the
reversing transaction. The journal entry date determines which fiscal year and
fiscal period that the reversing transaction is posted to.
- Select GL Distribution from the Void Checks palette. This will open the GL Distribution window.
- The Journal Entry field is used to enter the journal entry date of the reversing
transaction generated by the Void Checks process. The journal entry date will
determine what fiscal period and fiscal year will be affected by the check
reversal.
- The Journal Entry field will always default to the current date. Make sure to modify
this field if the voided checks should be posted to a different fiscal period.
- Click the Print icon to process the report immediately or enter a date and time in the field next to the Print icon to schedule the report to generate at a later time.
You can view the progress of the report on the Job Viewer window (SS> Utilities> Show Scheduled Jobs). Click here for information on the Jobs Viewer window.
- Click the Print icon drop-down menu and select Print Preview to preview the report before printing.
- Click the Print icon drop-down menu and select Excel to export the report data to an Excel spreadsheet as unformatted data.
- Click the Print icon drop-down menu and select Excel (Formatted) to export the report data to an Excel spreadsheet that includes much of the Springbrook formatting found on the printed version of the report.
- Once the report is generated, you can also display the report using the View Reports window (SS> Utilities> View Report). Click here for information on the View Reports window.
- Review the GL Distribution Report.
- The journal entry generated by the process will reverse the original journal entry generated when the check was
committed in the Computer Checks or Manual Checks process.
- If you would like to view the journal entry generated when a check was created, generate a Detail Distribution
Report (PR> Reports> Detail Distribution). This report displays the journal
entry generated by a Computer Checks or Manual Checks batch filtered by
employee.
5 Commit the batch and void the checks.
- Select Commit from the Void Checks palette. This will open an information window.
- Select YES to void the checks and create the reversing entries in the general ledger.
- Once the check is voided, you can view the voided check on the employee
record (PR> Maintenance> Employee> Open an employee> History tab> History
sub-tab> Void column). Click here for information on the History tab of the Employee Maintenance
window.
Springbrook Software
® All Rights Reserved 2017
Toll Free Support 866-777-0069