PR> Maintenance> Rate Code
Rate Code Maintenance
Summary
The Rate Code Maintenance window is used to create and
maintain rate codes. Rate codes allow you to assign different hourly rates to
employees depending on the work they are performing. This allows you to set
standard pay amounts for pay that is not related to the hourly pay rate attached
to each employee record. When a rate code is attached to a time card line item,
the hourly rate attached to the rate code will override the hourly rate on the
employee record. For example, if the hourly rate on the employee record is
$15.75 and the hourly rate on the rate code is $18.00, the hourly rate of $18.00
will be used on the time card line item.
Overtime pay is generally set up as a pay code (PR>
Maintenance> Pay Code) rather than as a rate code because you can set up a rate
multiplier on a pay code (PR> Maintenance> Pay Code> Rate
Multiplier field). The rate multiplier will increase the hourly rate
attached to each employee record when the time cards are generated. For example,
if you set up an overtime pay code with a rate multiplier of 1.5, the hourly rate
on the employee record will be multiplied by 1.5 when the overtime pay code is
attached to a time card line item.
If you use rate codes, make sure the Payroll module is set up
to use them (PR> Utilities> Setup> General tab> Use Rate Codes toggle).
If the Use Rate Codes toggle is not checked, the Rate Codes field on the
Timecards tab of the Employee Maintenance window will not be enabled.
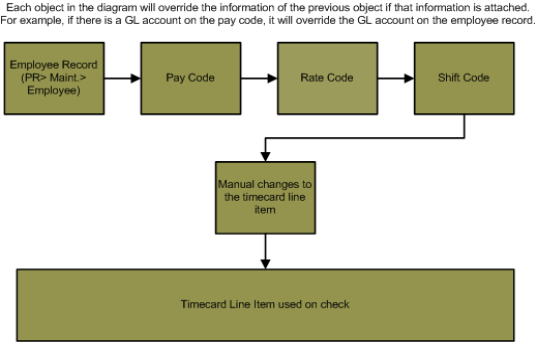
Flowchart
The diagram below represents how information is selected and attached to a timecard line item created using the Computer Checks
or Manual Checks process. All of the objects in the diagram are not required on
every timecard line item. The only object that is required on every timecard
line item is a pay code. Rate codes and shift codes are optional.
Related Links
Click here for information on pay code maintenance.
Click here for information on the Rate Code Master Report.
Click here for information on how revisions apply to Computer Checks.
Step by Step
1 View the existing rate codes in the Payroll module. 
- Open the Rate Code Selection window (PR> Maintenance> Rate Code).
- Sort the displayed rate codes by selecting a Status and clicking the Refresh icon
 .
.
- Highlight a rate code and press DELETE to delete the selected rate code.
- You cannot delete a rate code that is attached to an employee default time card (PR> Maintenance>
Employee> Timecards tab). You cannot delete a rate code that
is attached to employee history records.
- Highlight a rate code and press ENTER to open the selected rate code.
- Press INSERT to create a new rate code. This will open the Rate Code Maintenance window.
2 Create or modify a rate code.
- Enter a Rate Code. The Rate Code can be up to eight alphanumeric characters.
- Enter a Description. The Description can be up to 30 alphanumeric characters.
- Enter the hourly rate of the rate code in the Hourly Rate field. The hourly rate on the
rate code will override the hourly rate on the employee record when a time card
line item is created.
- Leave the Hourly Rate blank if you would like to use the hourly rate set up on
each employee record (PR> Maintenance> Employee Maintenance>
Financial tab> Hourly Rate field).
- If you would like to set the hourly rate for a specific employee, add the employee to the
Employees section. The hourly rate set up in the Employees section will override
the hourly rate set up in the Hourly Rate field for that specific
employee.
- The Hourly Rate will overwrite the Hourly Rate set up in the employee master, but the
rate multiplier from the Pay Code will be applied to this field.
- Enter a GL Account Number, Workers' Compensation Code and Project Management Task and Type Codes to overwrite what is on the employee
record when the rate code is attached to a time card line item.
- Leave the fields blank to use the employee defaults.
- GL accounts are attached to default time card line items. When a GL account is attached to the
rate code, the GL account on the rate code will overwrite the GL account on the
default time card line item. The GL account on the rate code will also overwrite
the GL account attached to the pay code on the time card line item.
- Click here for a brief
overview on how the GL account that is debited for the gross amount of
the timecard line item is selected in the Computer Checks process.
- Workers' compensation codes can be attached to the employee record (PR> Maintenance>
Employee> Financial tab> Workers' Compensation field) or
to the default time card line items (PR> Maintenance> Employee> Timecards tab> Workers' Compensation field). The workers'
compensation code attached to the employee record will populate on the default
time card line items. The workers' compensation code on the rate code will
overwrite the workers' compensation code on the default time card line item.
- Click here
for a brief overview of how the system selected which workers'
compensation code is attached to each timecard line item in the Computer
Checks process.
- The Project Management Task Code field is used to enter a Project Management module task
code on the time card line item. The task code attached to the rate code will
overwrite the task code set up on the default time card line item. The Project
Management Task Code field will only be enabled if you have the PM module
installed and set up to interface with the Payroll module (PR> Utilities> Setup>
General tab> Enable Project Management Interface toggle).
- You can also specify a partial PM task or type code. When calculating the PM impact on labor timesheet items, the task or type code information specified on the rate code will have precedence over task or type code information specified on the pay code. For example, if the rate code has a partial task code of XXX- and the pay code has a full task code of AAA-BBB, the task code that will appear on the timesheet would be XXX-BBB.
- The Active toggle is used to set up a rate code with an active
status. When a rate code is attached to an employee default time card (PR>
Maintenance> Employee> Timecards tab), or a time card line
item in the Computer Checks process (PR> Computer Checks> Timecards> Create
a line item), there is a drop-down menu that filters the rate codes that
display in the selection window by active status. By default, only active
status rate codes will display in the selection window, but users will be
able to attach inactive status rate codes to time card line items.
- The Always eligible toggle is used in conjunction with the unions
set up in the Human Resources module. Check this toggle if all employees,
regardless of union, can use the rate code.
- The Always eligible toggle determines if the rate code is
specific to a union. When this toggle is checked, all employees can use the rate code.
- If this toggle is not checked, only employees that belong to a union
with this rate code attached can use it.
- If you check this toggle, you
can still add the rate code to a union unit and set it up as a required
record, but the rate code can also be attached to employees that do not
belong to a union unit. For example, if you are creating a rate code that
is used by the members of a specific union unit, but should also be
available employees that do not belong to the union unit, check the Always eligible
toggle and add the rate code to the union unit (HR> Maintenance> Union
Unit> Rate Codes tab).
- Click here for an overview on union units.
- Click here for information on union unit maintenance.
- The Revisions section is used to set the hourly rate that will be applied when the rate code
is attached to time card line items. The Employees section is used to set the
hourly rate of a specific employee.
- If you would like to add an hourly rate to the rate code, add a line item to the Revisions
section. Click the drop-down menu next to the Create icon
 and select New
Revision to create a generic hourly rate. This will add a line item to the
Revisions section. You can modify an existing revision by modifying the fields
of an existing line item in the Revisions section.
and select New
Revision to create a generic hourly rate. This will add a line item to the
Revisions section. You can modify an existing revision by modifying the fields
of an existing line item in the Revisions section.
- The Effective Date field is used to set the date the revision
will become effective. Click here
for information on how revisions will be applied in a Computer Checks
batch.
- If you assign an hourly rate to the rate code, the hourly rate will
override the hourly rate on the employee record when it is attached to a
time card line item. This allows you to set standard pay amounts for pay
that is not related to the hourly pay rate attached to each employee
record.
- If there is a rate multiplier attached to a pay code on a time card
line item (PR> Maintenance> Pay Code> Rate
Multiplier field), the hourly rate on the rate code will be
multiplied by the rate multiplier on the pay code when a time card is
generated. For example, if you have a pay code for overtime pay that has
a rate multiplier of 1.50 and the hourly rate on the rate code is
$18.00, the rate multiplier on the pay code will be applied and the
employee will be paid $27.00 (18*1.5=$27.00) a hour on the time card
line item. This applies even if the employee is attached to the rate
code with a specific hourly amount (employees are attached to rate codes
using the Employees section). The hourly rate on the rate code set up
specifically for the employee will be applied to the rate multiplier on
the pay code. For example, if the employee is attached to the rate code
with an hourly rate of $10.00, the rate code will be applied and the
time card line item rate will be $15.00 (10*1.5=$15.00).
- Click the Delete icon
 drop-down menu and select Delete Revision if you would like
to delete a revision. You cannot delete a revision that is attached to an
employee default time card. You can only delete the latest revision. If you
would like to delete all of the revisions attached to a rate code, start with
the most recent revision and delete the previous revisions in descending order
by effective date.
drop-down menu and select Delete Revision if you would like
to delete a revision. You cannot delete a revision that is attached to an
employee default time card. You can only delete the latest revision. If you
would like to delete all of the revisions attached to a rate code, start with
the most recent revision and delete the previous revisions in descending order
by effective date.
- The Employees section is used to attach employees to a rate code
revision. This allows you to set a specific hourly rate on employee records
during the time when a rate code revision is effective. Select a rate code
revision in the Revisions section and add an employee to the Employee
section using the Create icon drop-down menu.
- Press ENTER or click the Save icon
 when complete to save the rate code.
Springbrook Software
® All Rights Reserved 2017
Toll Free Support 866-777-0069