PR> Timesheets Approval
Timesheets Approval
Summary
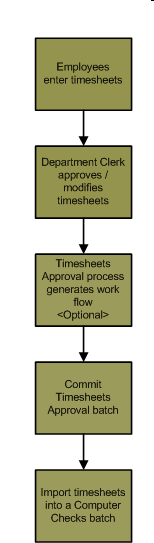
The Timesheets Approval batch process is used to approve or reject
timesheets that have been entered using the Timesheets palette
(PR> Timesheets). Once timesheets have been processed in a Timesheets
Approval batch, they can be imported into a Computer Checks batch (PR>
Computer Checks> Import Timesheets).
In order to use the Timesheets Approval process, your user account or the
position on the employee record attached to your user account must be set up
as a department clerk using the Role Maintenance window (SS> Security> Role).
Click here for
information on role maintenance.
When you create a Timesheets Approval batch and run the Settings step,
security is added to the batch so that only users that have the same
departmental security permissions can open or modify the timesheets in the batch. For
example, if the role you are attached to is set up as a departmental clerk in
department 001 and 002, only users that are set up as departmental clerks in
both 001 and 002 can modify the timesheets in the batch. If a user is set up
as a department clerk in 001 but not 002, they will not be able to open any
of the steps on the palette. If the user is set up as a department clerk in
departments 001, 002 and 003, they will be able to open the batch.
Related Links
Click here for general information on how to set up the Timesheets process..
Click here for information on how to set up the Timesheets and Timesheets Approval process.
Flowchart
Step by Step
1 Create a new Timesheets Approval batch. 
- Expand the Timesheets Approval palette. If there are
open batches in the process, they will not be affected when you create a new
batch. Once you select the timesheets you would like to include in the
batch, they cannot be pulled into other batches and employees will no
longer be able to access those timesheets on the Timesheets palette (PR>
Timesheets).
- Select New in the batch number drop-down menu. This will open the New
Batch window. Click here for
information on the New Batch window.
- The batch month and batch year of the Timesheets
Approval process is used for reference only. It has no effect on which
quarter or period the checks will be recorded in.
2 Select the pay schedule.
- Select Settings from the Timesheets Approval palette. This will open the Settings window.
- The Settings window is used to select the pay schedule
you would like to process in the batch. Only certain pay schedules will
display in the Pay Schedule drop-down menu.
- The pay schedules will populate in the drop-down
menu based on the role attached to your user account or the role
attached to your HR module position.
- Roles are created and maintained using the Role Maintenance window (SS> Security> Role).
Click here for information on Role maintenance.
- The system will determine which pay schedules should display in the drop-down menu using the following process:
- Determine the roles associated with your user account.
- Roles can be user names in two ways: directly by user name or indirectly by HR module position.
- User names are attached directly to roles using the Role Maintenance window (SS> Security> Role> Select User in the Type drop-down> User field).
- Users are indirectly associated with a role by attaching a user name to an employee record, attaching
the employee record to a position, and then attaching the
position to a role. Attaching a role to a position instead of a
user name allows you to automatically update the roles of
employees as they change positions. Click here for
information on setting up roles for the Timesheets process.
- Determine which departments are associated with
your roles.
- Once the system has established your roles,
it will compile a list of departments in which you are set up as a
department clerk. You can only approve the timesheets of employees
that belong to departments where you are set up as the department
clerk. For example, if you are the department clerk of department
100 and 200, you can only approve the timesheets of employees in
those departments.
- Search the employees in those departments and
determine which pay schedules they belong to, then display those pay
schedules in the drop-down menu.
- Select the pay schedule you would like to include in the batch in the Pay Schedule drop-down menu.
- If a pay schedule does not display in the drop-down menu, your user name or position is not set up as a department clerk
for the employees in the pay schedule.
3 Select the timesheets to include in the batch.
4 View the line items on each of the timesheets included in the batch.
- The Timesheets step is used to view, modify or delete the timesheet line items on the timesheets included in the batch.
- Open the Timesheet window (PR> Timesheets Approval> Timesheets).
- The Timesheets window will display a single line item for each employee included in the batch using the Select Timesheets step
(PR> Timesheets Approval> Select Timesheets).
- Select a timesheet and press ENTER to view the line items. This will open the Timesheet window.
- The Timesheet window displays all of the line items associated with the selected timesheet.
- The Timesheet section displays the employee information. These fields will not be enabled.
- Press INSERT or click the Create icon
 to add a time entry to the timesheet.
- Highlight a line item and click the Modify icon
 to modify it. This will open the Timesheet Line Item window.
- The appearance and fields that display on the Timesheet Line Item window can be modified using the Tab Order feature. For
example, if you will never enter a rate code or shift code on a timecard
line item, you can remove those fields from your window using the Tab Order
feature. If later on you have to enter a shift code or rate code, you can
add those fields back to the window be clicking on the Reset icon
 on the Tab
Order feature.
on the Tab
Order feature.
- The Tab Order feature is an optional tool used to improve data entry. This allows you to enter the data you would like
into the window and in the order you would like to enter it. This
feature only changes how you view the window. Other users will be able
to modify the window anyway they like and it will not affect how you
view your window.
- Click here for information on the Tab Order feature.
- Only the Date, Pay Code and Hours fields are required. All of the other fields are optional.
- The Date field is used to enter the date of the hours. Click the drop-down arrow to select the date using a calendar feature.
- The Type drop-down menu is used to select the type of timesheet entry you would like to make.
- Select Labor to enter labor hours.
- Select Equipment to record the use of a piece of equipment. For example, if a service truck was used for 2.5 hours, you
can select Equipment and then use the Timesheet Line Item window to
record the use of the equipment.
- Recording the use of equipment will not add time to the paycheck. For example, if you record 8 hours of use of a
piece of equipment, but you do not create a timesheet line item of 8
hours to record the amount of time worked while using the equipment,
that 8 hours will not be added to the paycheck.
- Selecting Equipment will change the appearance of the window. The Pay Code field will change to Equipment
Code and the fields that do not apply to equipment will become
disabled.
- The Equipment Code field is used to select the equipment you would like to record time on. Click the Equipment Code field label to select the equipment from a list.
- Equipment is created and maintained using the Equipment Maintenance window (WO> Maintenance> Equipment).
Click here for information on equipment maintenance.
- The Pay Code field is used to select a pay code.
- Pay codes determine how the time will affect the paycheck (for example, if the time is taxable or if the time reduces
accrued vacation or sick time).
- Pay codes are created and maintained using the Pay Code Maintenance window (PR> Maintenance> Pay Code).
Click here for information on pay code maintenance.
- The Rate Code field is used to attach a rate code to the timesheet line item.
- Rate codes act as a multiplier or modifier of the pay code. This is an optional feature that may not be used by your
organization.
- Rate codes are created and maintained using the Rate Code Maintenance window (PR> Maintenance> Rate Code).
Click here for information on rate code maintenance.
- The Shift Code field is used to attach a shift code to a timesheet line item.
- Shift codes modify the time on a line item. For example, you may have a shift code titled SWING that increases the
hourly rate of the hours on that line item by $1.00.
- Just like rate codes, shift codes are optional and may not be used by your organization.
- Shift codes are created and maintained using the Shift Code Maintenance window (PR> Maintenance> Shift).
Click here for information on shift code maintenance.
- The Hours/Units field is used to enter the number of hours on the timesheet line item.
- The Reference Number field is used to enter a work order reference number.
- This field will only be enabled if the Require unique reference number toggle is checked on the WO Setup window (WO> Utilities> Setup). Click here for information on the WO Setup window.
- Unique reference numbers can help Springbrook users easily attach work orders to timesheets without having to remember specific work order numbers or use the work order selection window.
- If this toggle is not checked the Reference Number field will not be enabled. If a reference number is attached to the work order selected below, that reference number will automatically populate.
- The WO Number, Activity Type, and WO Asset fields are used to add WO module work order information to the timesheet line item.
- You will not be able to attach a WO Number to the timesheet line item if the work order is locked (WO> Work Orders> Work Orders> Locked toggle).
- If a WO Number is specified, and the Require activity types toggle is checked on the WO Setup window (WO> Utilities> Setup), you will be required to attach an Activity Type to the timesheet line item as well.
- The selected Activity Type must be valid for specified work order.
- The Account field is used to enter a GL account on the timesheet line item. This field may populate if there is a GL account
attached to the pay code or rate code on the line item.
- The Workers' Compensation field is used to enter a workers' compensation code on the timesheet line item.
- Just like the Account field, this field may populate with a workers' compensation code based on the pay code or rate
code attached to the line item. If you leave this field blank, the
workers' compensation code attached to the employee record will be used.
- A workers' compensation code is attached to an employee record using the Employee Maintenance window (PR> Maintenance>
Employee> Financial tab> Workers' Compensation field).
- Click here for information on the workers' compensation code hierarchy.
- The Project Management module task and type code fields are used to add PM module information to the timesheet line items.
- The Notes field is used to enter notes on a timesheet line item. The department clerk that approved the timesheets will
be able to see the notes attached to the timesheet line items.
- Once the line item is complete, press ENTER to create another line item, or press ESCAPE to close the window.
- Once the line items of a timesheet are correct, press ENTER or click the Save icon
 on the Timesheets window to save the changes.
This will return you to the Timesheets window.
on the Timesheets window to save the changes.
This will return you to the Timesheets window.
- Review and modify the remaining timesheets in the batch and then print the proof list.
5 Generate the Proof List.
- The Proof List displays the timesheets in the batch.
- Open the Proof List window (PR> Timesheets Approval> Proof List).
- The Report Type drop-down menu is used to select the information that will display on the report.
- Select Employee Detail if you would like the report to display every timesheet line item on all of the employees in
the batch. This version of the report will also display the rate, shift,
GL account, workers' compensation code and PM module task and type codes
attached to each timesheet line item.
- Select Employee Summary by Code if you would like the timesheet line items on each employee to be totaled by pay code. For
example, if an employee records all of their time using a pay code
titled REG, but they took a vacation and recorded that time using a pay
code titled VAC, the proof list will display two line items: the hours
on pay code REG and the hours on pay code VAC. This version of the
report will not include the timesheet line item detail (rate code, shift
code, etc.).
- Select Employee Summary by Date if you would like the timesheet line items on each employee to be totaled by date. For
example, if an employee has three timesheet line items on 09/01/12, all
three of those line items will be totaled together on the proof list.
This version of the report will only display the date attached to the
timesheet line items. It will not include any other timesheet line item
detail (pay code, rate code, etc.).
- Select Work Order Detail if you would like the report to display all of the work order details associated with every timesheet line item on all of the employees in the batch. In addition to the work order number, this version of the report will display the WO reference number and WO activity type.
- The Sort By drop-down menu is used to select the order in which the employees will display on the report.
- Select Department, Employee Name if you would like the employees on the report to be grouped by department, and then by
employee first name.
- Select Department, Employee Number if you would like the employees on the report to be grouped by department, and then
employee number.
- Check the Page break by department toggle if you would like to insert a page break after each department included on the
report.
- Check the Page break by employee toggle if you would like each employee to display on a separate page on the report.
- Click the Print icon
 to process the report immediately or enter a date and time in the field next to the Print icon to schedule the report to generate at a later time.
You can view the progress of the report on the Job Viewer window (SS> Utilities> Show Scheduled Jobs). Click here for information on the Jobs Viewer window.
to process the report immediately or enter a date and time in the field next to the Print icon to schedule the report to generate at a later time.
You can view the progress of the report on the Job Viewer window (SS> Utilities> Show Scheduled Jobs). Click here for information on the Jobs Viewer window.- Click the Print icon drop-down menu and select Print Preview to preview the report before printing.
- Click the Print icon drop-down menu and select Excel to export the report data to an Excel spreadsheet as unformatted data.
- Click the Print icon drop-down menu and select Excel (Formatted) to export the report data to an Excel spreadsheet that includes much of the Springbrook formatting found on the printed version of the report.
- Once the report is generated, you can also display the report using the View Reports window (SS> Utilities> View Report). Click here for information on the View Reports window.
6 Generate the Alerts report.
- The Alerts report is used to notify the timesheets approver that the batch includes a transaction that might require additional attention.
- Open the Alerts report window (PR> Timesheets Approval> Alerts).
- Click the Print icon to process the report immediately or enter a date and time in the field next to the Print icon to schedule the report to generate at a later time.
You can view the progress of the report on the Job Viewer window (SS> Utilities> Show Scheduled Jobs). Click here for information on the Jobs Viewer window.
- Click the Print icon drop-down menu and select Print Preview to preview the report before printing.
- Click the Print icon drop-down menu and select Excel to export the report data to an Excel spreadsheet as unformatted data.
- Click the Print icon drop-down menu and select Excel (Formatted) to export the report data to an Excel spreadsheet that includes much of the Springbrook formatting found on the printed version of the report.
- Once the report is generated, you can also display the report using the View Reports window (SS> Utilities> View Report). Click here for information on the View Reports window.
- The report will display the Employee Number, Employee Name, Date, Alert and Message.
7 Generate a work flow. This is an optional step.
- The Generate Work Flows step applies if only certain employees are
allowed to commit a Timesheets Approval batch. For example, if you are a
department clerk, but only the department head is allowed to actually commit
a Timesheets Approval batch, then run the Generate Work Flows step to notify
the department head that a Timesheets Approval batch is ready to be
committed. If you do not use work flows, skip to the Commit step and
commit the batch. The committed timesheets can then be imported into a
Computer Checks batch (PR> Computer Checks> Import Timesheets).
- Select Generate Work Flows on the palette. This will open an information
window asking you to confirm your selection. Press ENTER or click the Confirm icon
 to
generate the work flows. This will create a job on the Jobs Viewer window.Click
here for information on the Jobs Viewer window. Once the job is
complete, the work flow will be created.
to
generate the work flows. This will create a job on the Jobs Viewer window.Click
here for information on the Jobs Viewer window. Once the job is
complete, the work flow will be created.
8 Review the work flows. This step is only required
when using work flows.
- The Review Work Flows step is used to view the
timesheets before committing the batch and is used in conjunction with the
Generate Work Flows step. For example, a department clerk runs the Generate
Work Flows step to notify the department head that timesheets are ready to be
approved. The department head receives an email that the batch is ready to
be committed, so they go into the Timesheets Approval batch, review the
timesheets, and then commit the batch.
- Open the Review Work Flows window to review the timesheets in the batch
(PR> Timesheets Approval> Review Work Flows).
- The Review Work Flows window displays the work flow generated by the
Generate Work Flows step (PR> Timesheets> Generate Work Flows).
- The Status column displays the status of the work flow. If the
work flow is waiting to be approved, the Status will be New.
- The Author column displays the department clerk that created the
work flow (this is the employee that ran the Generate Work Flows step). If
the timesheets are rejected, this is the employee that will receive the
notification email that the timesheets have been rejected.
- The type of work flow generated during the Generate Work Flows step
determines what needs to be done to the timesheets before the batch can be
committed.
- If the work flow is set up as an action step on your role (SS> Work
Flow> Work Flow Templates), you will have to approve or reject the
timesheets in the batch before you can commit the batch.
- If the work flow is set up as an information step on your role (SS>
Work Flow> Work Flow Templates), the commit step will be enabled and the
batch will be ready to commit. You will not be able to view the
timesheets in the batch or view the timesheet detail. When the work flow
is set up as an information step, skip the Review Work Flows step and
commit the Timesheets Approval batch.
- If you have to approve or reject the timesheets in the batch, highlight
the work flow in the Review Work Flows window and press ENTER. This will open
the Work History Proof List, displaying all of the timesheets in the batch.
- Review the timesheets. Click the Print icon to generate
a printed copy of the report.
- From the Work History Proof List, select the Work Flow menu at the
top of the window, and then select either Approve or Reject.
- If you select Accept, the Commit step on the Timesheets approval
batch will be enabled.
- If you select Reject, the author of the timesheets (the
department clerk that processes the timesheets) will get an email
notification that the timesheets have been rejected. This will
not reset the batch step of the Timesheets Approval process, but you
will not be able to commit the batch (the Commit step will not be
enabled). The department clerk will then go back into the Timesheets
Approval batch, modify the timesheets, and then run the Generate
Work Flows step again.
9 Commit the timesheets.
- Only timesheets that have been committed in a Timesheets Approval batch
can be imported into a Computer Checks batch (PR> Computer Checks> Import).
- The Commit step will not be enabled if the Generate Work Flows step
creates an action work flow and the timesheets in the batch have either not
been approved or the timesheets have been rejected.
- Select Commit on the Timesheets Approval batch. This will open an
information window to commit the batch.
- The Activity Batch field is used to specify an open Work Orders Activity batch.
- This field will only be active if an included timesheet has an attached work order. Any timesheet line item activity will be sent to the specified Activity batch and display as either Labor or Equipment activity. Once that activity is processed through the Activity batch, the hours recorded on the timesheet will populate the associated work order.
- Work order activity is processed on the WO Activity window (WO> Activity). Click here for information on WO Activity.
- The Activity JE Date field is used to specify the JE date attached to the journal entry that will be created by the resulting WO Activity batch.
- This field will only be enabled if an included timesheet has an attached work order AND the Automatically process activity batch toggle is checked below.
- The Transactions Batch field is used to specify an open IC Inventory Transactions batch.
- This field will only be active if a timesheet line item in the batch includes Materials activity that affects an IC item.
- If a transaction batch is not specified, the system will create a new Inventory Transactions batch for the new materials activity.
- Inventory transactions are processed on the Inventory Transactions window (IC> Inventory Transactions). Click here for information on Inventory Transactions.
- Check the Automatically process activity batch toggle to automatically process each step in the WO Activity process when the Timesheets Approval batch is committed.
- Checking this toggle enables the Activity JE Date above. The date specified in that field will be used as the JE date for the journal entry created when the new Activity batch is committed.
- When this toggle is checked, the Activity Batch field will be disabled and you will not be able to add the timesheet line item activity to an open Activity batch. Instead, the system will create a new Activity batch for the activity.
- Press ENTER or click the Confirm icon to
commit. Use the Jobs Viewer window to view the progress of the Commit step.
Click here for information
on the Jobs Viewer window.
Springbrook Software
® All Rights Reserved 2017
Toll Free Support 866-777-0069